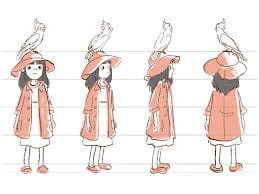
Assignment: Design an Animation Character of your own design on a Model Sheet.
Time alotted: 3 hours
Marks: 25
Due date: Monday or Tuesday April 12 or 13th (bring it with you to school)
NOw you need to enter the world of imaginary characters. Mickey Mouse, Spongebob, Aladdin and so many more. Shout out your favourite character designs!!! Take a look at the top 10 on this website:
https://www.smashingmagazine.com/2008/08/10-awesome-contemporary-character-designs/
For this assignment you need to explore how successful artists create a new, imaginative, and successful character designs for sculpting in 3 dimensions. You will then create an imaginative character of your own design. Finally, you are going to continue working in pencil and fineliner, and “sharpen” your model sheet skills 😉 by drawing your newly designed character on a model sheet.
Begin by designing an imaginary character using different shapes for the character’s silhouette. Here’s how:
You will need: pencil, eraser, paper
The first most important principle of good, memorable imaginary character design is that the character’s SILOUETTE needs to be distinguishable. For example, if I blackened in the body of Mickey Mouse, or Bart Simpson everyone would know who the character was simply by its silhouette. So to draw an imaginary character with a unique and distinguishable silhouette I recommend that you begin drawing with one of three basic shapes. Take a look at what Sycra does in this video.
Watch the video, then on a clean sheet of paper design a character, each using either triangles, circles, OR rectangles. Use your eraser, draw details and features, make the characters unique with impressive features.
Save your character design to hand in. When you are finished your character design you NEXT need to approach your character as a 3D sculptor would by preparing a model sheet of your new character.
Remember the model sheet from the beginning of the last assignment? You drew an object in your room from FOUR different points of view – front, back, side, and ¾ view. All four drawings were to be side by side across the sheet of paper. You drew horizontal lines through the paper to help you ensure that the features of your object all landed at the same height for every drawing.
Your character design assignment is:
to prepare a model sheet of your newly designed character.
Examples:
FIRST: Select a new page of paper. Turn it landscape so the widest part of the paper stretches across, not up and down. Divide the width into four sections.
SECOND: In the first section draw your character from the front Your character needs to be standing in a very simple pose. Fill the section, drawing the character as big as you can in the space that you have. Refine the lines. Add the details. Details are what makes your character design a real winner, so don’t skimp on them!
THIRD: Using a straight edge or ruler if you have it, lightly draw horizontal lines across the entire page at important points of the character, for example marking the base of its head, its shirt line, belt line, the elbow line, knee line, etc.
Fourth: Draw the character in the other three views across the page. Be sure that the landmarks that you drew lines across on the first drawing line up with those same landmarks on the second, third, AND fourth drawing. That way the character proportions are identical in every viewpoint drawing.
FIFTH: Refine and crisp your lines, using your eraser and a sure hand. When your pencil lines are perfect use a fineliner pen to replace the pencil lines .
This is not an easy task. Take your time. Use your eraser and refine your drawings until you are satisfied with the details. Then give yourself a pat on the back.
This is a pretty awesome character model sheet designed by one of your fellow students:
Bring your character design drawing AND your finished model sheet to class to hand in.
YOur Drawing and model sheet will be evaluated for the following criteria:
- Character uniqueness
- Character elaboration (details, details, details)
- FOUR different views of the character all on one model sheet
- Model sheet correctly uses horizontal guidelines
- Drawings are refined with an eraser and a fineline pen


