Sculpting the Head in Clay –rough form 3 hours due Thursday, Jan 14
The structure – I am posting an instructional videos for sculpting the head. It begins with BLOCKING THE SCULPTURE IN ON AN ARMATURE. Use this video, as well as the video on sculpting the maquette of the head, to help you sculpt the rough form of the head sculpture that you have planned for. Be sure to concentrate on the head anatomy forms of cranium, jaw line, brow line, etc. and LOOK AT YOUR WORK FROM ALL DIRECTIONS continuously.
Do NOT refine details of any part of the head anatomy at this stage. You are roughing in the basic form of your sculpture first.
In this video the artist uses a pipe and wire armature inside of the head. NOTE: You are not using an armature set-up (no wire or pipe inside of the clay). Instead you need to get a narrow glass, or narrow little bottle or can from your kitchen, turn it upside down on a cutting board and wrap it in a layer of paper towel or newspaper so that you can slide it out when the time comes.
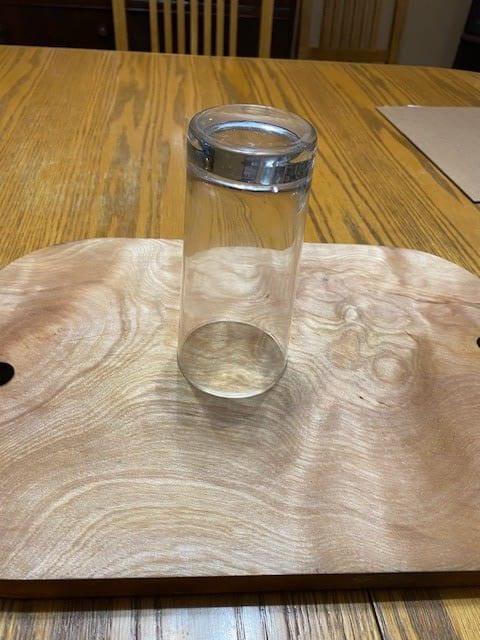

This becomes the neck up into the base of the head.
Zoe, the sculptor in this video, has a live model to work from as she sculpts. You can set up a mirror and work from that, but you will also need to open the 4 photos that you took of yourself in the assignment before this. They replace the model and give you lots of accurate image information about the form of the head from each of the different viewpoints to sculpt from.
You can now block in the head sculpture as Zoe does in her video.
Mass the clay on, working to try to get the shape of the portrait from the front and from each of the sides and back. Hold the pictures of your head up beside the clay sculpture so you can shift your eyes back and forth from the subject to the sculpture to compare.
Be sure to TURN YOUR SCULPTURE many times as you work on it, rather than just working on it from the front. Sculpt the sides profiles. Then go back to the front. Don’t forget the back! Notice how Zoe turns her sculpture many times as she builds it up.
The SIDE VIEW is SO helpful in gaining a likeness. Use the side views frequently, then turn to the front and build it up as well.
Remember the Zygomatic bone from the maquette assignment? It is a very important landmark in shaping your sculpture.
Remember all the different face shapes from the drawing and maquette assignments? Look for the particular shape of your face. Use the maquette video to review the different forms of the head.
Continue to sculpt the head, hair and other masses all IN THEIR ROUGH FORM. This should include the forehead, eyes (rough, not detailed), nose, mouth, chin, ears (roughed not detailed), hair, neck, and any other mass forms of your sculpture (ie. hat? shoulders?).
Stop when it is completely roughed in, much like Zoe’s sculpture looks at the 6min.30sec. point in her video. You need to complete the roughed in form of your ENTIRE sculpture before proceeding to fine details of any of the parts.
Once your sculpture is COMPLETELY roughed in, you will need to cut your sculpture in half and hollow it out before you proceed to the details of your sculpture. Go to the next lesson on this blog for how to hollow out the sculpture.