https://www.desmos.com/calculator/i5oixsnjcu
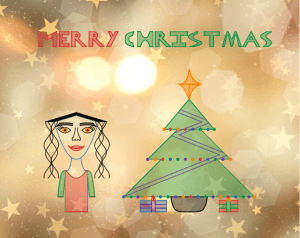
I started off this project by creating a rough sketch of what I wanted to do. After creating the sketch, I had to look back at the different graphs we did throughout the year to try and fit them into my card. This process was not very challenging because I was able to manipulate the graphs to fit into my vision. Creating the outline of my card on Desmos was one of the easier aspects of the project because I had already figured out the different functions I was going to use for each image.
I was able to design most of the card easily, but I kept on avoiding the self-portrait part of the card because I am not artistically talented. I was able to create the head and the eyes by myself, but I was unsure about the other facial features I had to add. I tackled this problem by searching up Desmos self-portraits to get some inspiration. After looking at a few different examples of Desmos art I was able to create my own my self-portrait.
One of the challenging aspects of this project was being precise with the graphs. This was challenging for me because I had to be able to manipulate the y-intercepts and roots of the functions to make them meet in a certain spot. From afar the graphs often looked like they met and terminated but when you zoomed in you could see that the graphs actually continued for a little bit. This caused me to use many decimal places in the y-intercepts and restrictions in order to be precise.
A mistake I made was not naming my functions. After finding out I had to use function notation I had to take time to rename each of my functions. At first, I found this very challenging because I didn’t remember what function notation was but after getting help from Ms. Hubbard I was able to utilize function notation. This project would’ve taken less time if I started off by using function notation because I wrote out every single equation instead of taking advantage of function notation.
One of the things that I struggled with the most was shading my card. This was the biggest struggle I faced because I did not name my functions when I started the project. It was especially difficult when I started shading the images with more complex functions. I became frustrated when I was shading but I overcame this challenge by shading the images with basic functions to help build my shading skills. Another aspect of the shading that frustrated me was when I would use the wrong variable for the inequality which caused there to be a bold line in the middle of the area shaded. I resolved this problem by looking at Ms. Hubbard’s example online which helped me realize that I had to shade one image with multiple inequalities. If I had to redo this project I would name each function to make it easier and less time consuming to shade.
I think that this project represents my uniqueness because I was able to use a combination of the cosine and sine graphs to create my hair. I did multiple transformations to the cosine and sine graphs to make it slightly resemble my hair.
Although this project made me frustrated a number of times I think it was a good experience because it helped me realize how much I actually know about Pre-Calculus. I think this project helped me better understand the different functions we learned about and it made me realize my math skills. I think this project was a good way to reflect on our comprehension of the units we have covered. Overall, I am proud of the card I made because it took a lot of effort and it ended up looking good.
