The Effect Temperature Has on Enzymes

Names: Avery, Hanna, Gracyn, Manroop

Date: April 18th 2019

Introduction: 

Glucose is a sugar, which acts as energy for many of the functions our cells do. The glucose level in your body rises when you eat food. This activity will help you learn the relationship between temperature and enzymes, by using lactase enzyme drops. Lactase is an enzyme that works in our bodies to break down the sugar in milk (lactose), but as we grow older our body stops producing this enzyme which is why some people are lactose-intolerant. 

In this lab, you will heat four samples of milk to different temperatures and measure the glucose count in each of the test tubes using glucose test strips. Glucose test strips indicate the amount of glucose in a substance by changing colours, each colour represents a different volume in the measurement mmol/L and g/dL. 

Purpose: To figure out the effect of temperature on the reaction rate of enzyme reactions.

Hypothesis: Higher temperatures cause a faster reaction rate, therefore more glucose will be present when we test it. Lower temperatures will slow down the reaction rate, therefore less glucose will be present. The test tube heated to above 45 degrees should have no glucose present.

Materials:

  • 100 mL milk
  • Lactase enzyme drops
  • 4 Glucose test strips
  • 4 test tubes
  • 2 400 mL beakers
  • Hot plate
  • Ice 
  • 2 stirring rods
  • 2 thermometers
  • Test tube rack
  • Test tube tongs
  • Eyedropper
  • Graduated Cylinder 

Procedure: 

  1. Measure out 10mL of milk into 4 test tubes
  2. Put room temperature water (20 degrees Celsius) into one 400mL beaker. Monitor with a thermometer. 
  3. Put cold water (10 degrees Celsius) into the next 400mL beaker. Monitor with a thermometer.
  4. Put hot water (30 degrees Celsius) into the next 400mL beaker. Monitor with a thermometer.
  5. Put hotter water (above 45 degrees Celsius) into the last 400mL beaker. Monitor with a thermometer.
  6. Place one of the milk test tubes into each of the beakers. Place a thermometer in the test tube and watch for the temperature of the milk in the test tube to match the temperature of the water in the beaker.
  7. Once the test tubes get to the correct temperature, place 2 drops of the enzyme into each test tube and set a timer for 1 minute.
  8. After one minute, insert a glucose strip into each test tube, take it out, and observe the colour of the strip.
  9. Match up the colour observed on the strip with the colour on the glucose strip bottle. 
Temperature  Colour of Glucose Test Strip


Trace of Glucose 


10°C


Teal/Light Green


6 mmol/L


23°C


Peanut Brown 


56 mmol/L


33°C


Dark Brown


111+ mmol/L


65°C


Mint Blue


0 mmol/L


Graph: 

Temperature vs. Glucose Count After 1 min 
80 
40


Questions: 

What did the results show? At what temperature was there the most glucose present – why do you think this was the result?

The glucose strip revealed that the highest glucose count was at 33°C. We believe that this is because as the temperature increases the reaction rate also increases. Whereas, at the lowest temperature, 10°C, there was little glucose present in the test tube. 

 If the temperature continued to decrease what would happen to the glucose count? Why do you think this occurs?

At 10°C there was the least amount of glucose because the reaction rate is slower at this temperature, which means that we would have to leave the lactase enzyme in the lowest temperature for a longer time in order to get a higher glucose count. 

Explain what happened after the enzyme was placed in the test tube above 45 degrees. 

Although the glucose count continued to grow as the temperature increased, at the highest temperature, 65°C, no glucose was present in the test tube. This happens because after the lactase enzyme is heated up to a certain temperature the enzyme starts to denature. 

Conclusion:

This lab helped us determine the effect of temperature on the reaction rate of enzyme reactions. We predicted that at the lowest temperature the glucose count would be the least and at the highest temperature no glucose would be present. Through this experiment, our hypothesis was proved to be correct. At the lowest temperature little glucose was present because the reaction rate decreases as the temperature lowers. At the highest temperature, 65°C, the glucose strip showed a negative result because the enzyme had denatured. The most glucose resulted in the test tube that was heated to 33°C, this is because enzymes denature at 45° or above, but since this was below that temperature it had the most glucose present. Overall, this lab gave us a clearer understanding of the relationship between temperature and enzymes. 

Errors/Improvement: 

To improve our lab design, we could’ve tested the lactase enzyme at a variety of  temperatures instead of only testing it at four. By doing so, we could get an even greater understanding of the effects of temperature. We think testing one on colder temperatures than what were in our experiment would be interesting. During the lab, it was also difficult to maintain a constant temperature. As well, our timing between dropping in the enzyme and dipping in the strip was not exactly equal between each test tube. For next time, we could be more accurate with this to get a more exact number on the glucose strip. 


Diffusion in Agar Cubes – Cell Size Lab

Hypothesis: A smaller cell will have a higher diffusion rate because it has less volume and a larger surface area compared to larger cells.

The agar cubes before submerging them in NaOH:

One minute after being in NaOH:


Nine minutes of the cubes being in NaOH:

After 10 minutes:

Our data table:

Conclusion Questions 

In terms of maximizing diffusion, what was the most effective size cube that you tested?

We found that the most effective size was the cube with the volume 1 cm3 . The 1 cm3 cube had 75% diffusion whereas the others had 46% and 50% diffusion.

Why was that size most effective at maximizing diffusion? What are the important factors that affect how materials diffuse into cells or tissues?

The smallest size was the most effective because it’s surface area to volume ratio was higher than the other two cubes. Since it had a small volume it was easier to spread throughout the cube. The cubes surface area allowed it to have more space for the diffusion to actually occur. The important factors that affect how materials diffuse are temperature, concentration, surface area, and volume. An area with a lower temperature causes the diffusion to occur at a slower rate. The concentration of the substance used can fluctuate the rate of the reaction as well, a higher concentration increases the reaction rate. As we saw in our lab, the smaller the volume and a larger amount of surface area enhances the diffusion rate.

 If a large surface area is helpful to cells, why do cells not grow to be very large?

 As a cell grows, the SA:V ratio changes too. In the SA:V ratio, the volume grows at a faster rate compared to surface area. This causes the effectiveness of a cell to decrease as it grows to be larger, which is why cells stay small.

You have three cubes, A, B, and C. They have surface to volume ratios of 3:1, 5:2, and 4:1 respectively. Which of these cubes is going to be the most effective at maximizing diffusion, how do you know this?

The cube that is the most effective out of A, B, and C will be the cube with the 4:1 ratio. This is because it has the highest SA:V ratio, which maximizes diffusion compared to the other two. It has the highest surface area so there is more space for the diffusing material to go through the cube and it also has the smallest volume which means it is easier to diffuse the cube completely.

 How does your body adapt surface area-to-volume ratios to help exchange gases?

In the human body, our cells adapt to surface area to-volume ratios by having cells in a long thin shape and/or in an elongated shape. The body also folds the surface of the cell membrane to help exchange gases.

Why can’t certain cells, like bacteria, get to be the size of a small fish?

At first, bacteria have a high diffusion rate because they have a large SA:V ratio. Bacteria then continue to increase in size which decreases the SA:V ratio and also decreases the amount of diffusion that occurs. This causes the cell to divide to regain a high diffusion level, so that it can receive the substances it requires.

What are the advantages of large organisms being multicellular? 

Larger organisms being multicellular causes a higher diffusion rate in the body. This is important because cells need certain substances to do their functions like gas exchange and the movement of materials in and out of the circulatory system. Since multicellular organisms have more cells they can also perform more functions.

Physics of Brazilian Jiu Jitsu

Brazilian Jiu Jitsu is a martial art that is played around the world. Torque is one of the main concepts used in Brazilian Jiu Jitsu because it makes a greater impact on the competitor while fighting. In Brazilian Jiu Jitsu, you often see someone of a smaller size fight someone who is bigger than them and still win. This is because of their use of torque. Torque is used in Jiu Jitsu when a competitor uses a leverage point on the body to put them in a lock, like the elbow or the knee.

Torque: Torque is a measure of how much the force acting on an object causes that object to rotate. Torque is directly proportional to the perpendicular distance of the force used.

Fulcrum: A Fulcrum, also known as the pivot point, is a location on a system that can change its direction.

Force: Force is a push or pull on an object.

Lever: the perpendicular distance from the axis of rotation to the line along which the force acts.

Center of Gravity: The point at which a systems mass is concentrated.

Why does Jiu Jitsu follow this progression?

The primary goal of a jiu jitsu fight is to get your opponent on the ground because that gives you more control in the fight. Attacking body parts that have joint locks are important because they are used as lever points.

Why does Brazilian Jiu Jitsu want control?

Once a competitor has control over the opponents body, the opponent is more likely to give up in the fight because they cannot regain their force.

The picture below shows the example of the kimura:

Although you cannot see the fulcrum point in the picture, it would be the opponents elbow. This is because the elbow can only bend until a certain point and once you reach that point the opponent starts to feel a lot of pain which leads them to give up.

The next picture shows an example of the kneebar:

Again, in the picture you cannot see the fulcrum point but it is the opponents knee. Since the knee only bends until a certain point, once you exceed that point it causes the opponent excruciating pain.

How does a Brazilian Jiu Jitsu practitioner’s understanding of physics (Torque) make him or her more effective? 

You can take advantage of the higher center of gravity of a larger opponent to get them down to the ground quicker, which would assist in you winning the match. If you utilize torque in a Brazilian Jiu Jitsu match properly, factors like size and strength do not effect your ability to win.

Protein Synthesis – Transcription and Translation

How is mRNA different than DNA?

mRNA and DNA have many differences. Firstly, the bases used in DNA and mRNA are different. DNA uses cytosine, thymine, adenine, and guanine, whereas mRNA uses uracil instead of thymine. Another one of the structural differences between mRNA and DNA is that DNA has two backbones and mRNA has one backbone. Since RNA has one backbone it has a different shape than DNA, DNA has a double helix and RNA is untwisted. The backbone of mRNA is composed of ribose and phosphate, and DNA’s backbones are made of deoxyribose and phosphate. mRNA is also much shorter than DNA, it is roughly 1000 nucleotides in length and DNA is around 85,000,000 nucleotides in length.

In the pictures below, you can see a side by side comparison of DNA and RNA. DNA is twisted into a double helix, has two blue backbones (deoxyribose), and has blue beads (to represent thymine). RNA is in a straight line, has one red backbone (ribose), and has brown beads (uracil base).


Describe the process of transcription:

The process of transcription happens when mRNA copies the information carried by a gene that is on DNA. Transcription starts in the nucleus and produces mRNA. The process of transcription contains three different steps: unwinding and unzipping DNA, complementary base pairing with DNA, and the separation from DNA. These three steps all happen with the assistance of the enzyme RNA polymerase.

Unwinding:

The first step of transcription is the unwinding of the DNA backbones. The DNA backbones unwind in order for mRNA to copy the information on the DNA strand. The enzyme RNA polymerase unzips DNA at the location of a gene.

Complementary Base Pairing:

In the complementary base pairing step, one strand of DNA is used as a template to build the mRNA. This strand is referred to as the sense strand because it has the instructions for building a protein, whereas the other strand does not have the information needed to build a protein and is not needed in the process of making mRNA, this strand is referred to as the nonsense strand. RNA polymerase places the correct bases on the mRNA strand.  Since we are dealing with mRNA, instead of using the base thymine we use the base uracil. This means that adenine pairs with uracil and guanine still pairs with cytosine.

The picture below shows the complementary base pairing step in transcription. The fuzzy peach represents the enzyme RNA polymerase. The mRNA strand is being built using the DNA strand on the right, the sense strand, as a template. The strand on the left is the nonsense strand which is why the mRNA strand is not facing it. We tried to show that RNA polymerase is putting the complementary bases on the mRNA strand by placing the fuzzy peach in the middle of the sense strand and the mRNA strand.

Separation:

Once all a genes information has been copied, the mRNA then separates from the DNA sense strand. The DNA backbones then join together again and twist back into a double helix shape. Although the mRNA has been separated from the DNA strand, it is still modified. After the separation from DNA, the mRNA strand removes sections that do not contain the proper instructions to build a protein. After this modification occurs, the mRNA molecule leaves the nucleus.


How did today’s activity do a good job of modelling the process of RNA transcription? In what ways was our model inaccurate? 

I think that today’s activity did a good job representing the differences of RNA and DNA. We were clearly able to see how DNA and RNA differ, like their backbones and the bases. We used blue pipecleaners to represent the deoxyribose backbone along with pink beads to represent the phosphate units on the DNA backbone, whereas for RNA we used red pipecleaners to represent the ribose sugar backbone but still used the pink beads to indicate the phosphate units on the RNA backbone because DNA and RNA have the same type of phosphate units. We also used a different coloured bead on our RNA model to indicate it contained Uracil instead of Thymine. In this activity we continued to use two beads when indicating guanine and adenine, to show that they are double-ringed bases. One of the things that we could have improved was the size of the RNA model. The RNA model was around the same size as the DNA molecule which is inaccurate since DNA is much longer than RNA. We also didn’t go over the process after separation like the modification of mRNA before it leaves the nucleus.

Part II:

 Describe the process of translation: initiation, elongation, and termination.

Translation is the process that happens after transcription. In translation, the code carried by mRNA turns into a polypeptide by the help of ribosomes. A ribosome reads the mRNA message and puts amino acids in order and make the protein. The three steps of translation are initiation, elongation, and termination.

Initiation:

The first step of translation is initiation. In this step mRNA is held by a ribosome, which then binds to another ribosome subunit. The ribosome finds the codonAUG in the P-Site on the mRNA strand because this codon initiates the rest of the order of amino acids. The AUG codon pairs with the anticodon UAC. The anticodons can be found by using the complementary base pairs, AUG pairs with UAC because Adenine pairs with Uracil and Guanine pairs with Cytosine.

In the picture below, you can see that the ribosome (red piece of paper) goes down the mRNA until it finds the codon AUG. After it finds the codon AUG the anticodon UAC pairs with it which is written on the green piece of paper (the tRNA). Since each codon represents an amino acid, the codon AUG corresponds to the amino acid Methionine which is shown by the blue piece of paper which is also attached to the tRNA.


Elongation:

After the codon AUG is found, the ribosome continues to go down the mRNA strand and reads the codons on it. Codons are three lettered words that indicate specific amino acids and adds another tRNA molecule. Since the first codon AUG is in the P-site, the second codon has to be carried to the A-site. When both the A-site and the P-site are filled, the amino acid at the P-site transfers to the amino acid on the A-site. The tRNA at the P-site floats away once the codon is transferred.  The ribosome then moves down the mRNA strand to the next codon which moves to the A-site as the second codon moves to the P-site. The chain of amino acids grows depending on the number of codons using the same process. The corresponding anticodons will also continue to be added to the chain as well. These amino acids keep on binding together which creates a polypeptide chain, the beginning of a protein. This continues on occurring until the tRNA reaches the STOP codon in the A-site.

In the picture below, the next codon is read after AUG. The new codon is in the A-site:

The tRNA molecule floats away as the amino acid moves to the A-site:

The ribosome moves down the mRNA strand and the tRNA move back to the P-site:

The process continues to occur:

Termination:

The last step of translation is termination. This is when a stop codon is found, a codon that does not have a matching tRNA. This means that no new amino acid is added to the chain which causes the polypeptide to be released with the use of hydrolysis.  The ribosome are released and also split back to their subunits.

This picture shows our final amino acid sequence. Our amino acid sequence matched to the Topoisomerase protein:

Then the polypeptide amino acid chain is released from the tRNA and ribosome:

How did today’s activity do a good job of modelling the process of translation? In what ways was our model inaccurate?

This activity really helped me understand the process of translation because at we were able to visualize it in an organized way. I liked how the different components involved in the process were separate colours, like the ribosome was red and the tRNA was green. One thing that was inaccurate was that there weren’t the subunits needed for the ribosome, we just had one large ribosome, this also effected the termination step because we weren’t able to show the ribosome breaking down. Another inaccurate factor was the shapes of the amino acids, on the protein sheet it shows that each amino acid has a unique shape but for this activity all of them were the same shape.

DNA Structure and Replication Lab

Explain the structure of DNA – use the terms nucleotides, antiparallel strands, and complimentary base pairing.

 DNA is a large polymer that is constructed of nucleotide monomers. DNA is built of phosphate, a nitrogen base (pyramidines and purines), and a pentose sugar (deoxyribose).  DNA (deoxyribonucleic acid) consists of two backbones that are made of repeating sugar-phosphate units. DNA is twisted into a double helix shape. The backbones of DNA are antiparallel which means that one of the strands goes from 3’-5’ and the other goes from 5’-3’. The 3’ indicates that the side has a hydroxyl group and the 5’ represents the side with the phosphate group. The strand that starts with 3’ is the leading strand and the strand that starts with 5’ is the lagging strand. Since DNA is read from 3’-5’ the strands are read in the opposite directions. The nucleotide bases on the backbones extend inward and they also form H-bonds between their complimentary base which causes the rung structure of DNA. The nitrogen bases used in DNA are from two different groups purines (Adenine and Guanine) and pyramidines (Thymine and Cytosine). Purines have a double ring base and pyramidines have a single ring base. The four nucleotide bases of DNA are Adenine, Guanine, Cytosine, and Thymine Adenine has to bond with Thymine, its complimentary partner, and Cytosine has to bond with Guanine, its complimentary partner. The complimentary base pairing is required so that the message on the strands can be read.

In the picture below is our DNA model. The blue pipecleaner represents the backbone and the pink beads represent the phosphate to show the sugar-phosphate backbone. The antiparallel structure of the DNA strands is shown in the model by the pink beads. At the top of the left backbone there is a pink bead (phosphate) but at the top of the right backbone there is no pink bead, similarly at the bottom of the left backbone there is no pink bead, but on the bottom of right backbone there is a pink bead. You can also see that the green beads (cytosine) are always paired up with the purple beads (guanine) and the yellow beads (adenine) are consistently paired with the blue beads (thymine), this represents the element of complementary base pairing in DNA. The beads are connected by a white pipecleaner which represents the H-bonds that are formed when they are paired together. The picture on the left clearly shows the rungs formed by the H-bonds and the picture on the right shows the double helix shape of DNA.


How does this activity help model the structure of DNA? What changes could we make to improve the accuracy of this model? Be detailed and constructive.

This activity was a great way to visualize the actual structure of DNA because you could clearly see the antiparallel strands, H-bonds formed by the bases, the different bases (double and single), and sugar phosphate backbones. One of the things that could be better indicated in this activity could be the 3’ and 5’ ends of the backbones because you couldn’t clearly see which side was which. It was also hard to keep our phosphate beads from moving in between the H-bonds of the nucleotides, which made it a little difficult to show the antiparallel strands.

PART II:

When does DNA replication occur? 

DNA replication occurs in the nucleus of a cell. DNA replication takes place during interphase right before cell division. In order for cells to divide they have to double their genetic information, which is why DNA replication is a vital step for cell division. DNA replicates itself trillions of times in a lifetime. Each replicated DNA molecule has a strand from the original DNA molecule (parent) and a new strand (daughter).

Name and describe the 3 steps involved in DNA replication. Why does the process occur differently on the “leading” and lagging” strands?

 Unwinding:

The first step of DNA replication is unwinding. The two backbones unzip which means that the H-bonds between the nucleotides break. The DNA Helicase enzyme causes the unwinding of the backbones. This process splits the leading strand and the lagging apart. These two strands are then going to be used as templates to make the daughter strands.

 Complimentary Base Pairing:

The next stage of DNA replication is complimentary base pairing. Now that the backbones are split the daughter strand can now get the correct nucleotides in place to replicate the parent strand. Cytosine still bonds with guanine and adenine bonds with thymine, this makes the antiparallel strands. This process is caused by the enzyme DNA polymerase which causes the bases on the parent strand to have their complimentary partner. DNA polymerase can only copy strands in the 5’-3’ direction, this causes the lagging strand to be copied in a number of sections and not straight down. This also causes the lagging strand to take a longer time to replicate its DNA.


Joining:

The last step of DNA replication is joining. In this step the complimentary bases form H-bonds to join together and the sugar and phosphates form covalent bonds to join together. On the leading strand, this process is continuous as the DNA molecule unzips. Whereas on the lagging strand, there are fragments of nucleotides which require the enzyme DNA ligase to join these fragments together.

The processes are different depending on the type of strand because a lagging strand has to go through extra steps. Since DNA polymerase cannot copy the strands in the 3’-5’ direction there are segments of the lagging strand that are missing. DNA polymerase eventually goes back to these segments and pairs the nucleotides with their proper complimentary partner.

The picture below shows the process of replication occurring. The watermelon represents the enzyme DNA helicase. The watermelon continues to move up the DNA molecule to unzip the backbones. The blue bigfoot represents DNA polymerase which is why it is on both the lagging and leading strands. The red bigfoot is only on the strand on the right because it is the lagging strand. As you can see in the picture, the strand on the right has fragments of nucleotides missing.

The result of DNA replication is two DNA molecules that are identical to each other.

The model today wasn’t a great fit for the process we were exploring. What did you do to model the complimentary base pairing and joining of adjacent nucleotides steps of DNA replication? In what ways was this activity well suited to showing this process? In what ways was it inaccurate?

In order to show complimentary base pairing, we placed the blue bigfoot in the areas where the bases had just been paired up. I think that we could have done a better job by clearly showing that the bases had not bonded together yet and were still waiting to go through the joining process. We showed the joining of adjacent nucleotides by placing the red bigfoot in the area of the missing segments of the lagging strand. I think that this activity helped me gain a stronger understanding of the general process of DNA replication because we had to go through each of the steps. I think that this activity didn’t go very in depth with the process of polymerase because we didn’t address the use of RNA primase. We could’ve shown the process of ligase better by having more fragments on the lagging strand.

Desmos Holiday Card

https://www.desmos.com/calculator/i5oixsnjcu

I started off this project by creating a rough sketch of what I wanted to do. After creating the sketch, I had to look back at the different graphs we did throughout the year to try and fit them into my card. This process was not very challenging because I was able to manipulate the graphs to fit into my vision. Creating the outline of my card on Desmos was one of the easier aspects of the project because I had already figured out the different functions I was going to use for each image.

I was able to design most of the card easily, but I kept on avoiding the self-portrait part of the card because I am not artistically talented. I was able to create the head and the eyes by myself, but I was unsure about the other facial features I had to add. I tackled this problem by searching up Desmos self-portraits to get some inspiration. After looking at a few different examples of Desmos art I was able to create my own my self-portrait.

One of the challenging aspects of this project was being precise with the graphs. This was challenging for me because I had to be able to manipulate the y-intercepts and roots of the functions to make them meet in a certain spot. From afar the graphs often looked like they met and terminated but when you zoomed in you could see that the graphs actually continued for a little bit. This caused me to use many decimal places in the y-intercepts and restrictions in order to be precise.

A mistake I made was not naming my functions. After finding out I had to use function notation I had to take time to rename each of my functions. At first, I found this very challenging because I didn’t remember what function notation was but after getting help from Ms. Hubbard I was able to utilize function notation. This project would’ve taken less time if I started off by using function notation because I wrote out every single equation instead of taking advantage of function notation. 

One of the things that I struggled with the most was shading my card. This was the biggest struggle I faced because I did not name my functions when I started the project. It was especially difficult when I started shading the images with more complex functions. I became frustrated when I was shading but I overcame this challenge by shading the images with basic functions to help build my shading skills. Another aspect of the shading that frustrated me was when I would use the wrong variable for the inequality which caused there to be a bold line in the middle of the area shaded. I resolved this problem by looking at Ms. Hubbard’s example online which helped me realize that I had to shade one image with multiple inequalities. If I had to redo this project I would name each function to make it easier and less time consuming to shade.

I think that this project represents my uniqueness because I was able to use a combination of the cosine and sine graphs to create my hair. I did multiple transformations to the cosine and sine graphs to make it slightly resemble my hair.

Although this project made me frustrated a number of times I think it was a good experience because it helped me realize how much I actually know about Pre-Calculus. I think this project helped me better understand the different functions we learned about and it made me realize my math skills. I think this project was a good way to reflect on our comprehension of the units we have covered. Overall, I am proud of the card I made because it took a lot of effort and it ended up looking good.


The Taking Tree – Poetry Project


The Taking Tree - Manroop Thandi 

The maple tree is dying,

Once red and beautiful

With a strong thick trunk,  

Took a sip of the bittersweet

Flight away from life,

In the midst of removing every dried-up leaf,

Giving the other roots grief

Disregarding its surroundings.


The maple tree is dying,

This tree is drowned in an anesthetic

That is reactive but not proactive,

The drink that causes sad happiness

Trusting a true trick.  

creating loneliness.


The maple tree is dying,

The dark day has come,

Now unable to see

It will never breathe

The dagger strikes the tree ,

as it falls down gloomily

Quietly and quickly as fast as

when it started blooming,

it finally acknowledges the world it didn’t get to see.


the maple tree is dying.


Composition:

People often rely on drugs and alcohol as a vanity away from problems but fail to acknowledge the repercussions of such actions. In the poem The Taking Tree, Manroop Thandi displays the theme of using drugs/alcohol to hide pain. The Taking Tree is a free verse and open poem. The speaker is someone who is close with someone who has experienced drug abuse before. The poem is an extended metaphor about someone who abuses substances, this is shown in line 10 “this tree is drowned in an anesthetic”. The anesthetic represents a numbing agent that limits pain but only lasts for a short amount of time, this could represent a drug or alcohol.


Thandi’s choice of using maple trees as a comparison to a person could be because a maple tree is very vibrant but after constantly misusing substances it is dead and has lost its life. In line three Manroop says “with a strong thick trunk” this could be representing the strong mind it began with and how substances started destroying its solid roots (mind). The “dried-up leaves” is a metaphor for problems. The tree wants to remove all of the things that bring down the vibrancy of the tree. The line “of removing every dried-up leaf” is also a hyperbole because removing all problems from a one’s life is impossible. Line 8 shows that drug abusers do not know the trail that substance abuse causes and how much it emotionally affects others. The line, “this tree is drowned in an anesthetic” is a hyperbole because the tree is over using this drug for tranquility. Line 11 “that is reactive but not proactive” represents that the drugs the person is taking is only a solution for a limited time but in the long run it will never go away. The poet also shows that the ultimate result in abusing drugs instead of facing problems will result in in loneliness, “trusting a true trick. Creating loneliness”. In lines 21-22 the poet compares the day the tree bloomed to the day it is dying by using a simile. This comparison is made because when the tree bloomed it was excited to grow, similarly, when it dies it will finally have peace. Thandi also uses the symbol of darkness and a dagger to represent death. There are also a couple of examples of personification in the poem. In line 3 Thandi says, “took a sip of the bittersweet” this is personification because trees cannot sip.


Thandi also uses sound devices such as repetition, alliteration, cacophony and oxymorons. Throughout the poem, Thandi repeats the line “the maple tree is dying” to emphasize the effect of the drug abuse on the people surrounding the abuser.  In line 13 Thandi says, “trusting a true trick” this is alliteration because of the repeating “tr” sounds. In line 12, Thandi uses an oxymoron “the drink that causes sad happiness”, this represents a faux experience. In the hopes of reviving everything, the person has become depressed. The person fails to realize that this drug is not causing happiness but affecting everything around it. Line 13 is also an oxymoron because “true trick” contradict each other, this is because the person using the drugs believes that this is a real solution but later figures out it was all a trick.The person abusing drugs believes that drugs will solve all problems but later realizes that life with the drugs/alcohol created many more problems rather than solving them. The poet also uses cacophony in line 3 by repeating the “k” sound and in line 21 by repeating the “q” sound.


The poem The Taking Tree use many figurative devices to show the path someone going through drug abuse. This poem is insightful to the human condition because many people deal with substance abuse in attempts to hide pain but fail to recognize the effects of these actions.

Week 18 – Final Review

This week in Pre-Calculus 11 we are reviewing for the final. The top 5 things I learned in Pre-Calculus 11 are calculating the discriminant, CDPEU, solving equations, finding the vertex of a parabola, and special triangles.

Calculating the Discriminant: The discriminant has been helpful throughout Pre-Calculus 11 because with the discriminant you can find out how many solutions/roots/x-intercepts an equation has or whether it is an extraneous solution. The discriminant is derived from the quadratic formula \frac{-b\pm\sqrt{b^2-4ac}}{2a}. The discriminant is the part that is under the square root sign b^2-4ac. If the discriminant is negative that means that there are no solutions, it does not have a x-intercept and/or it is an extraneous solution because there cannot be a square root of a negative number. If the discriminant is equal to zero that means that the equation has one solution. If the discriminant is positive that means there are two solutions.

Ex. x^2+3x+30 

b^2-4ac 

3^2-4(1)(30) 

9-120 

-111 


CDPEU: CDPEU was introduced in the quadratics unit. The acronym helps you remember the steps of factoring. The letter C represents “Is there anything in common?”.

Ex. 2x^2+8x-10 

2(x^2+4-5)

2(x+5)(x-1) 

In the example above all of the terms shared a common multiple of 2, so I factored it out. After factoring the 2 out I continued on and factored.

The letter D represents “Is there a difference of squares”. A difference of squares only occurs in binomials. A difference of squares requires two square roots where one is negative.

Ex. x^2-49 

(x-7)(x+7) 

The example above is a difference of squares. Both the first term and the second term are perfect squares which means I could factor the expression easily. You have to make sure it is a DIFFERENCE of squares and not a SUM of squares, otherwise you will not be able to use this strategy.

The represents the word pattern. The pattern that we look for when factoring is a^2+bx+c. If the expression or equation does not have this pattern it is linear. If it is a quadratic then you have to categorize it using the next two letters.

9x-3 

3(x-1) 

The example above is not a quadratic expression but a linear expression because there is no x^2. Even though this is a linear expression you can still factor it.

The letter E represents the word easy. This is when there is not a coefficient in front of the x^2 and it is easily factorable.

Ex. x^2+x-20 

(x+5)(x-4) 

The example above, is easy to solve because there are two numbers that multiply to 20 and add to 1.

The letter represents the world ugly. An ugly quadratic equation is when there is a coefficient in front of the x^2. This causes the quadratic expression to be hard to factor.

Solving Inequality Equations: To solve inequality equations algebraically we used the method of substitution. After finding each of the values of x and y it is important to always verify the solution by plugging it back in.

Ex. y=x^2+6x+2 and y=2x-1 

y=2x-1 

STEP 1: 2x-1=x^2+2x+4 

0=x^2+6x-2x+2+1

0=x^2+4x+3 

0=(x+3)(x+1) 

x+3=0

x=-3 

x+1=0 

x=-1 

STEP 2: y=2x-1   x=-3 

y=2(-3)-1 

y=-6-1

y=-7 

(-3,-7) 

STEP 3: y=2x-1   x=-1 

y=2(-1)-1 

y=-2-1 

y=-3 

(-1,-3) 

STEP 4: y=2x-1  (-1,-3) 

-3=2(-1)-1 

-3=-2-1 

-3=-3 

STEP 5: y=2x-1   (-3,-7) 

-7=2(-3)-1 

-7=-6-1 

-7=-7 

In the example above, the first step was to isolate one of the variables from one of the equations but that was already done. The next step was to plug in the value we found in the previous step into the other equation. After that I brought all of the terms onto one side of the equation and then factored the equation to find out the x 
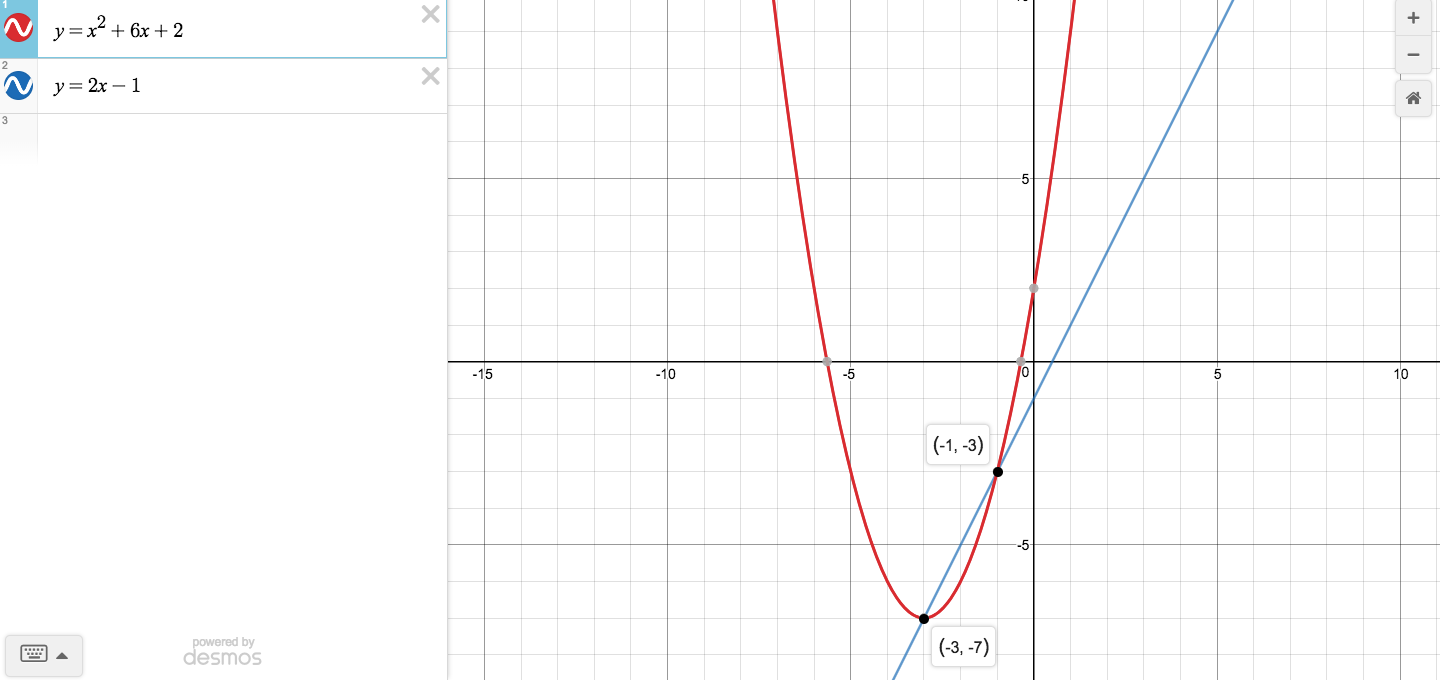
values. Then I plugged in the x values into one of the equations to find the y value. To make sure that both of the points that I found were solutions I plugged those values back into one of the original equations and made sure both of the side were equal to each other.

Finding the Vertex: Finding the vertex of a parabola is one of the most important things I’ve learned this year because we have used parabolas throughout the course. To find the vertex of a parabola you have to complete the square. When you complete the square you divide the middle term by two and then square it.

y=x^2+8x-23 

\frac{8}{2}^2=\frac{64}{4}=16 

y=x^2+4x+16-16-23 

y=(x+4)^2-39 

Vertex: (-4,-39) 

In the example above I used completing the square to find the vertex. There was not a coefficient in front of the x^2 which made the equation easier to factor.

Special Triangles: One of the most important things I learned was the special triangles. Special triangles prevent the use of calculators because they always have the same patterns. One of the special triangles has a 1-\sqrt{3}-2 
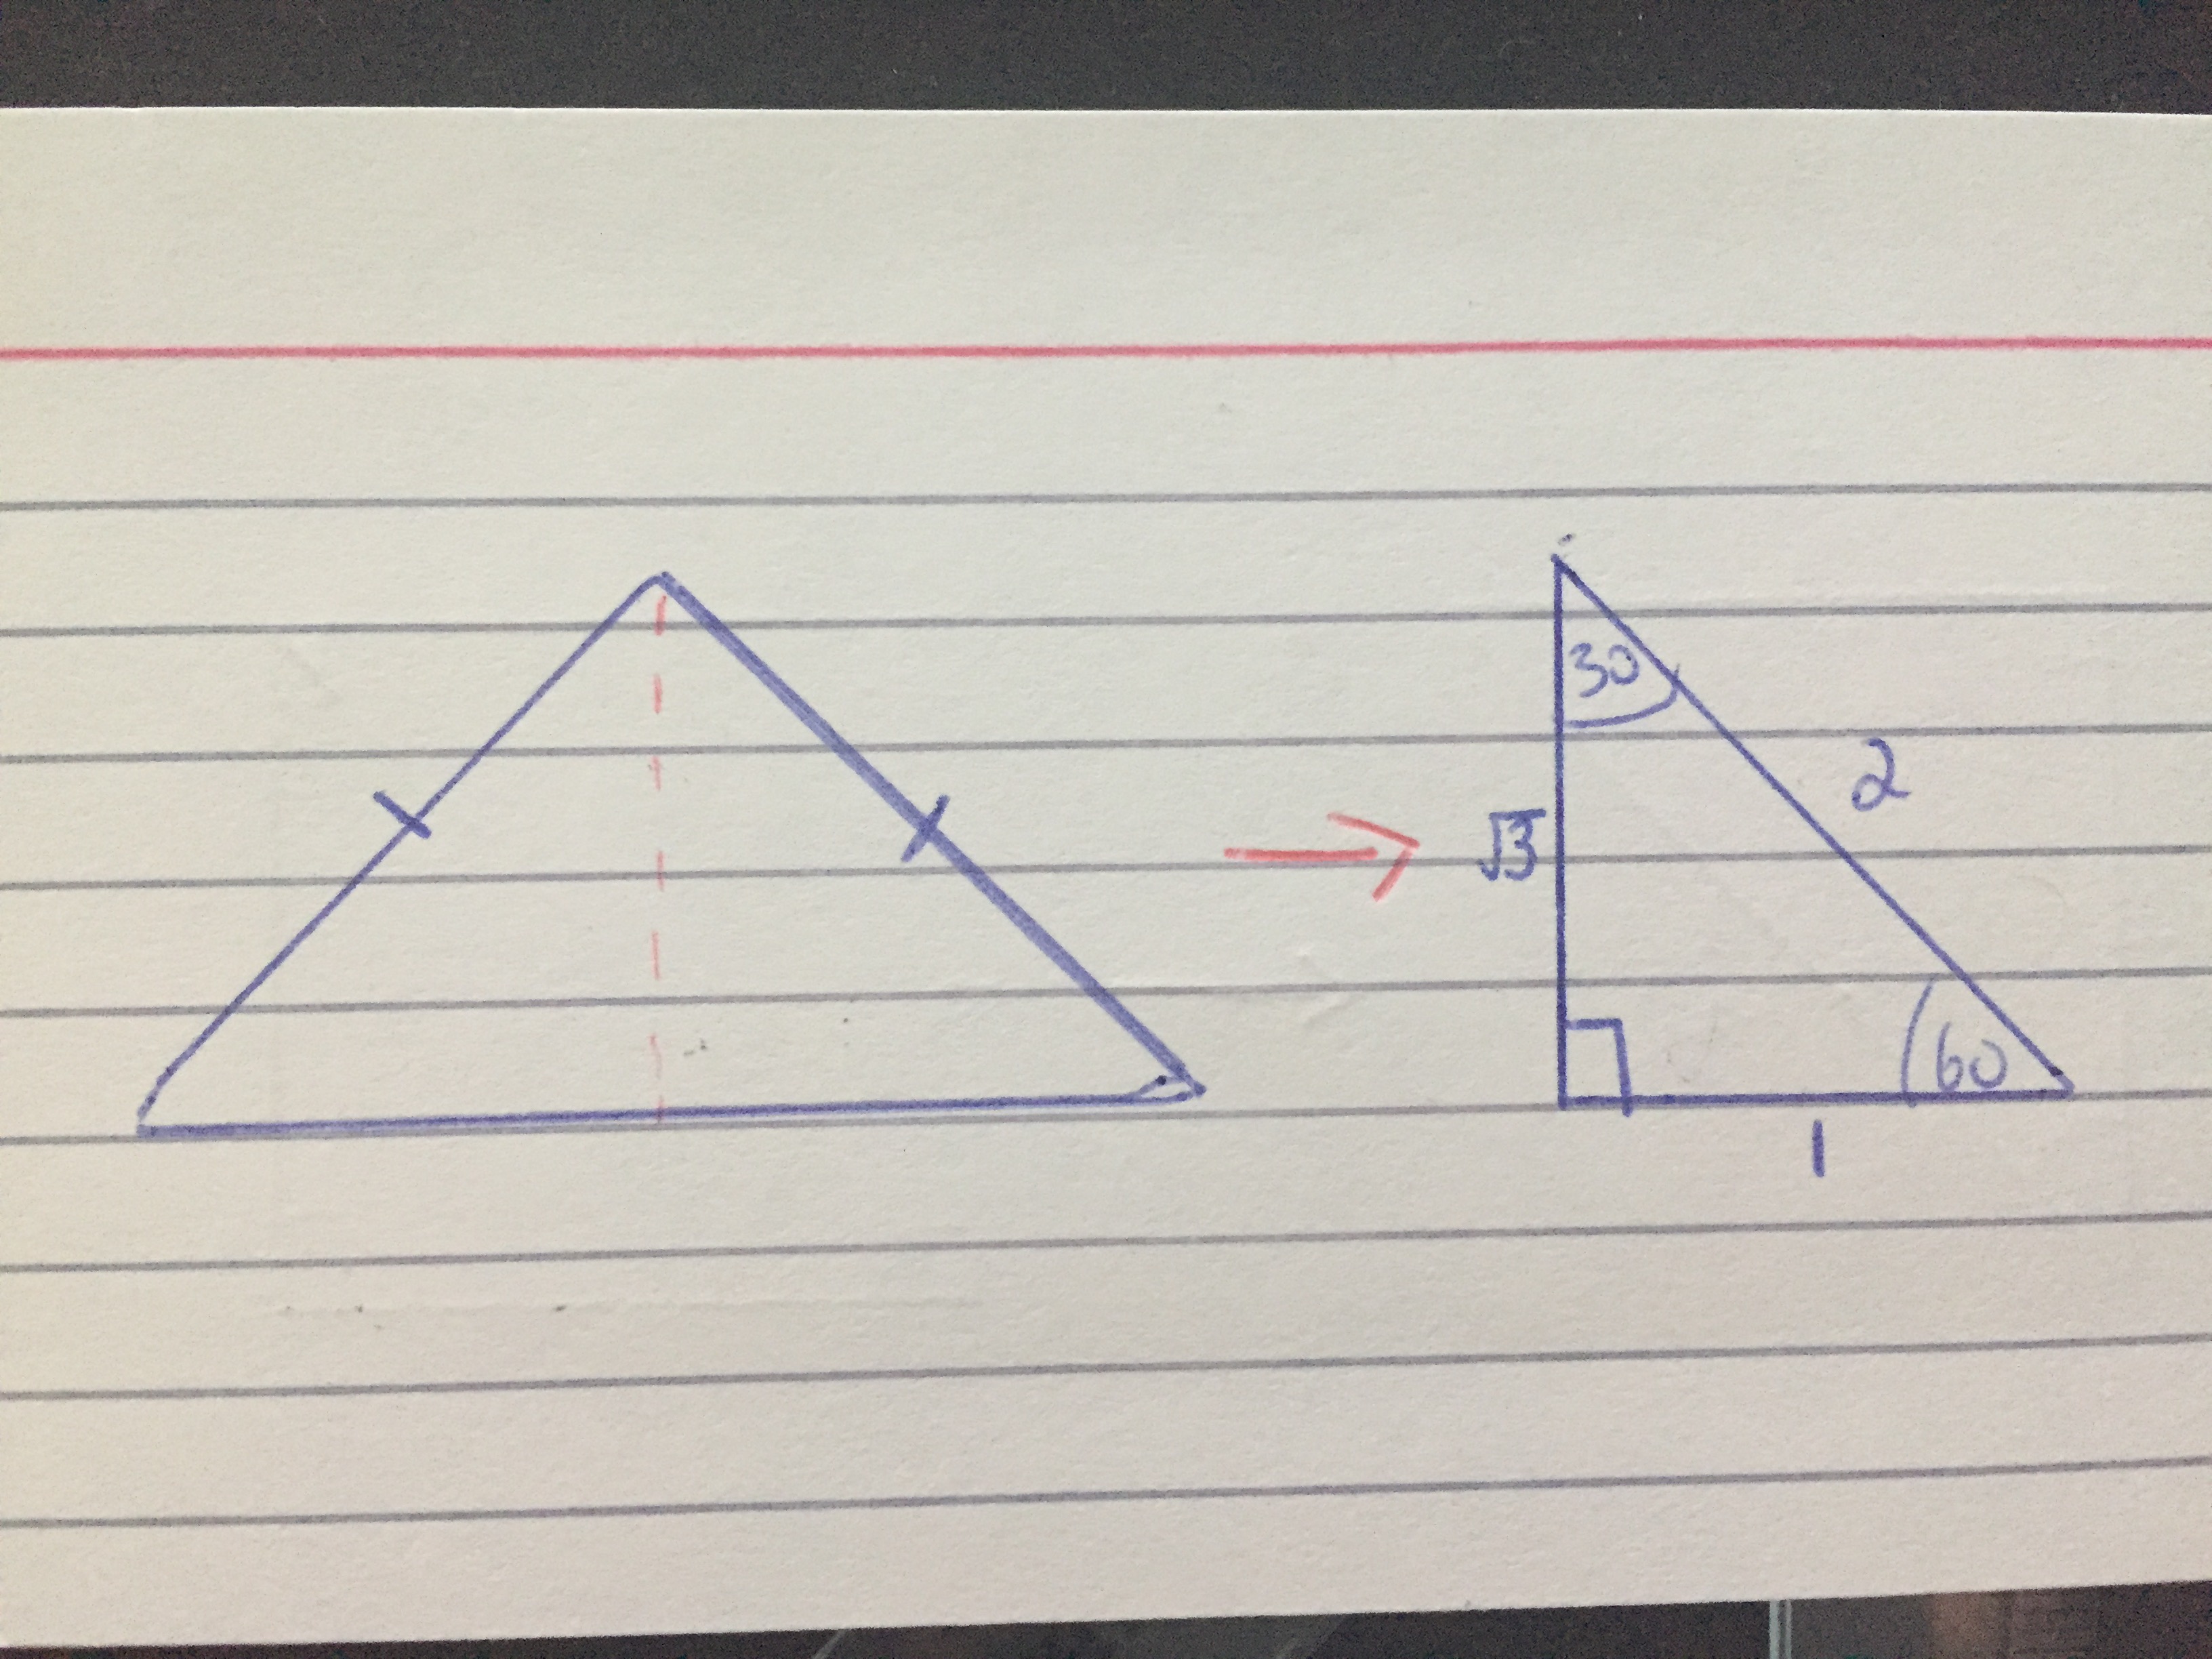
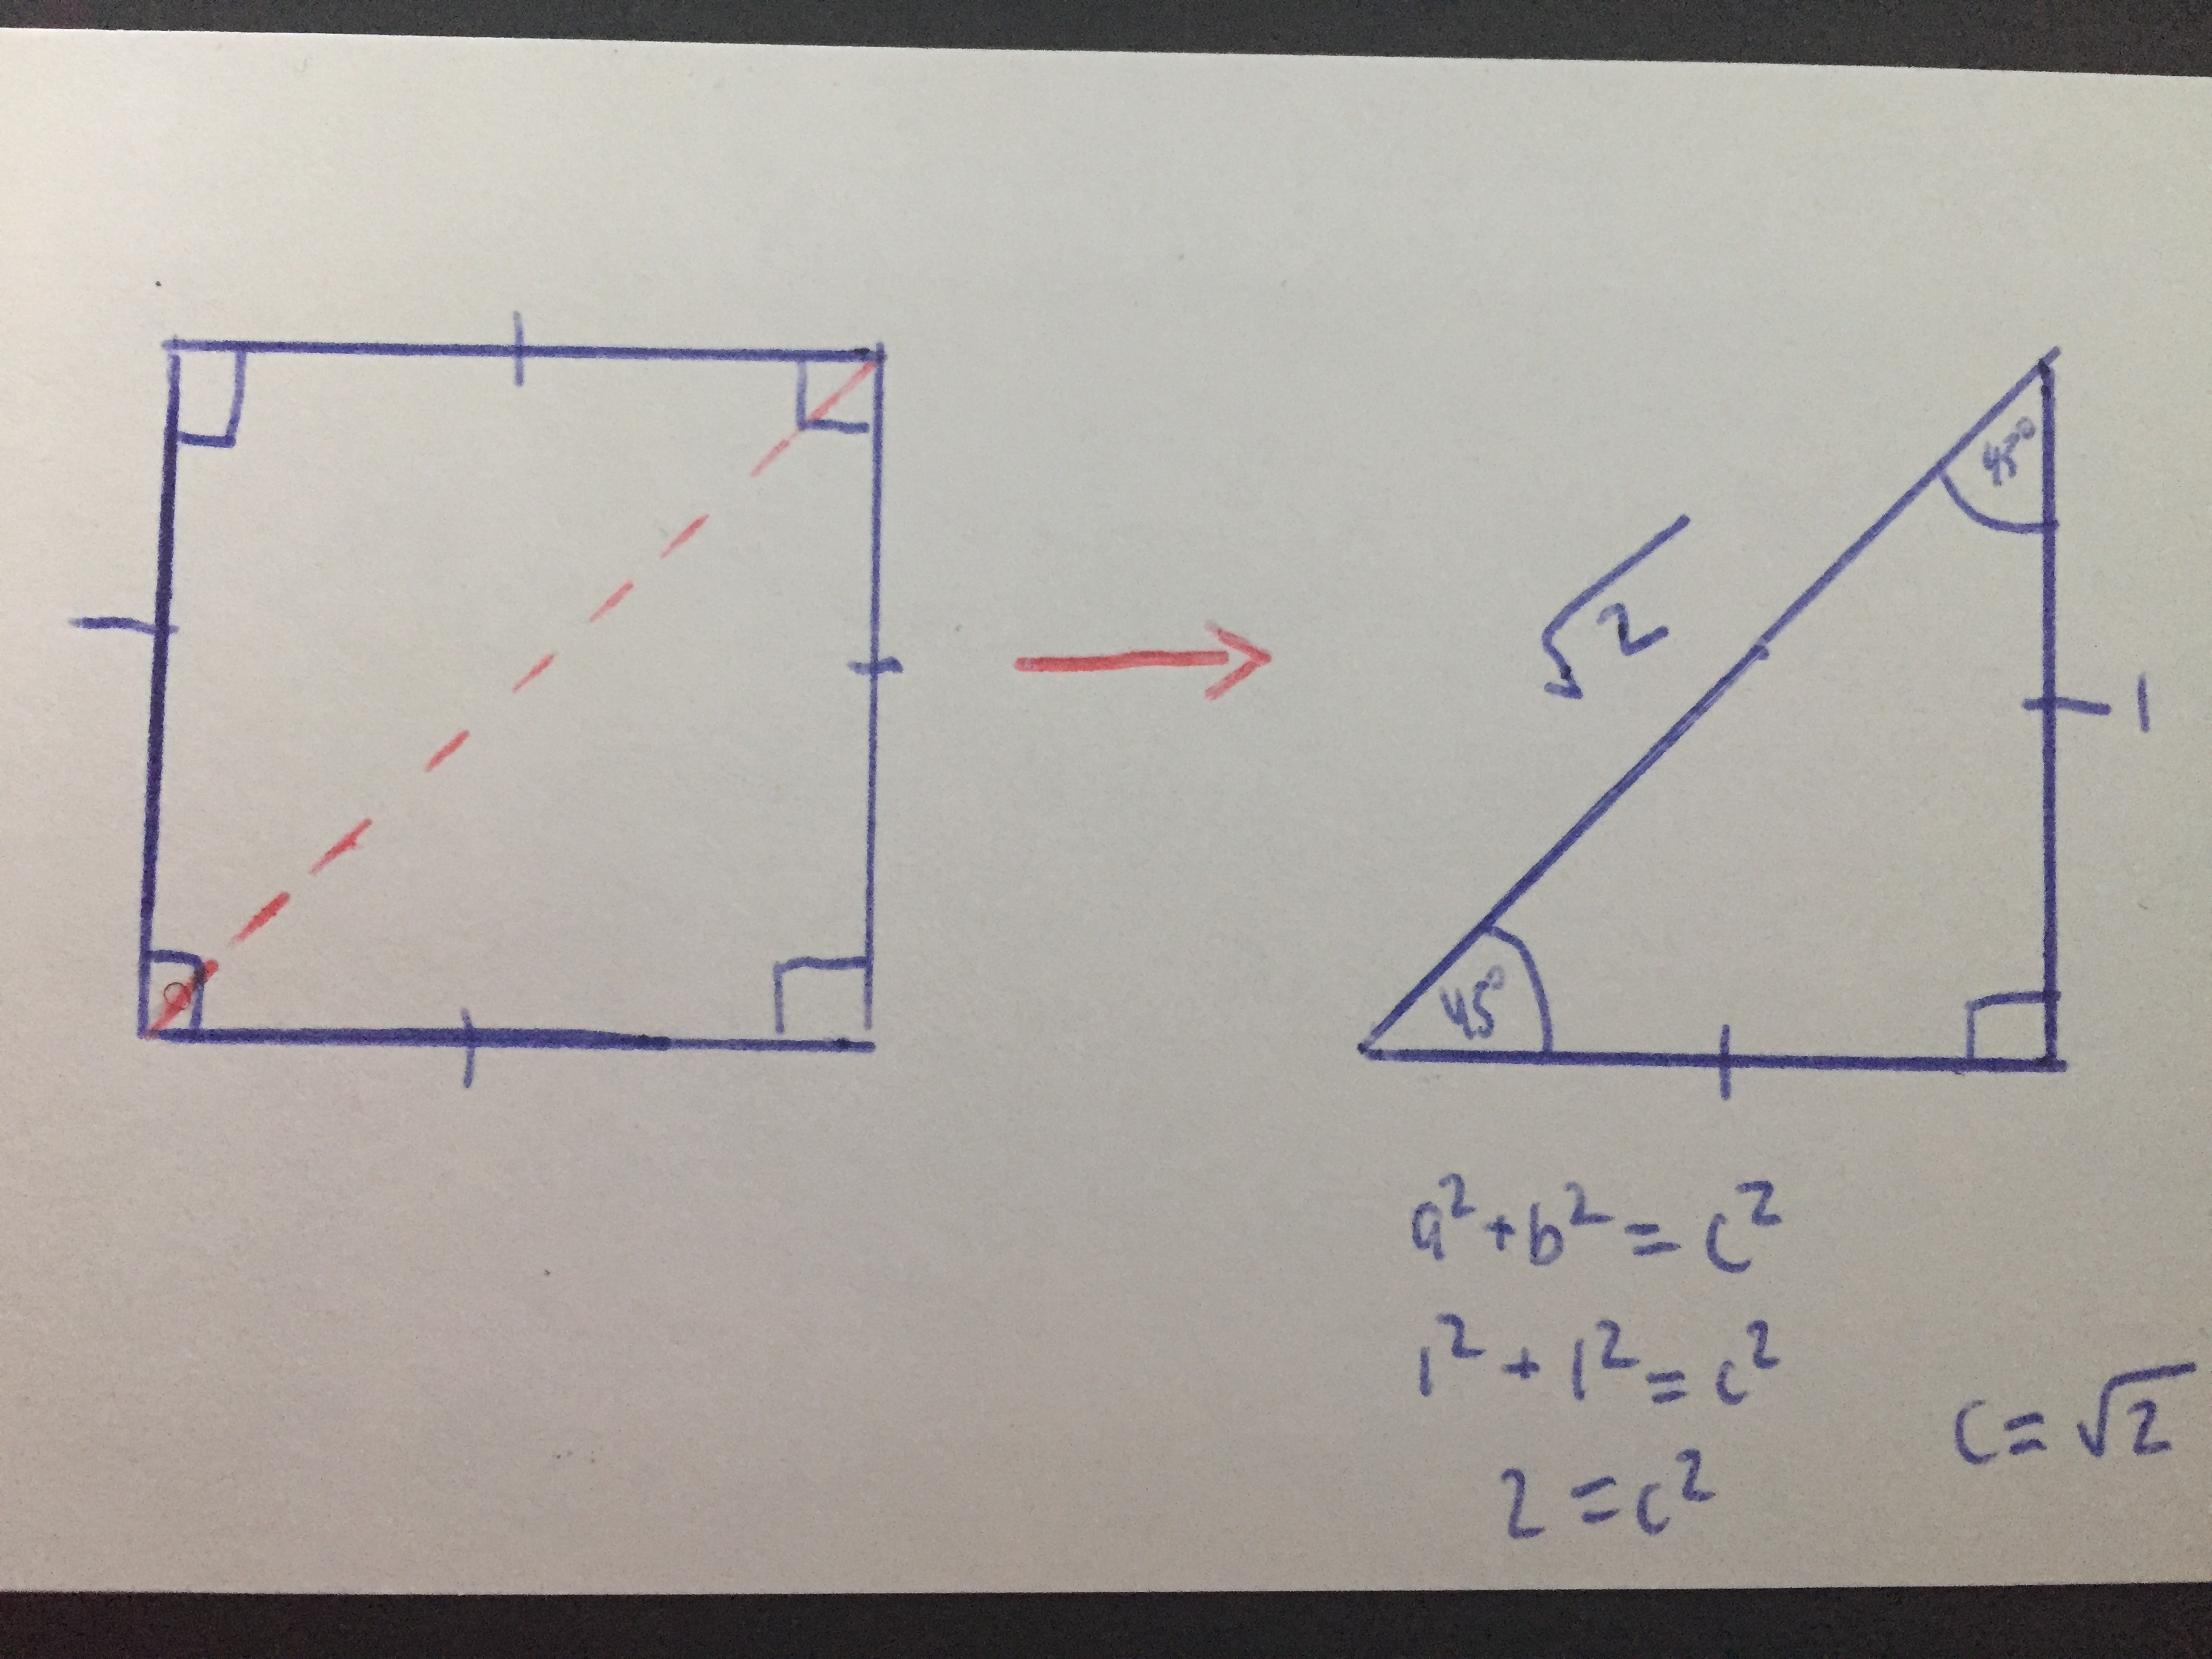
pattern which means that the angles are 90-60-30. Another one of the special triangles is the 1-1-\sqrt{2} which has the angles of 45-45-90.

Ex. What is the exact cosine ratio for 225 degres?

225-180=45 

\cos45=\frac{1}{\sqrt{2}}


Week 17 – Trigonometry

This week in Pre-Calculus 11 we started the trigonometry unit. This week we learned about the sine law and the cosine law.

What is the Sine Law? The sine law is typically used when you are not dealing with right triangles. Although the sine law could be used with right triangles it involves more steps. When solving a triangle that doesn’t have a right angle you cannot use SOH CAH TOA, you have to use the sine law or cosine law. The formula for finding an angle is \frac{\sin(A)}{a}=\frac{\sin(B)}{b}=\frac{sin(C)}{c}. The formula for finding a side length is the reciprocal \frac{a}{\sin(A)}=\frac{b}{\sin(B)}=\frac{c}{\sin(C)}.

Ex. In a triangle \angle(B)=34, side c is 14.0cm and \angle(C)=65. What is the side length of b to the nearest tenth?

\frac{a}{\sin(A)}=\frac{b}{\sin(B)}=\frac{c}{\sin(C)}

\frac{a}{\sin(A)}=\frac{b}{\sin(34)}=\frac{14}{\sin(65)}

\frac{b}{\sin(34)}=\frac{14}{\sin(65)}

b=\frac{14\times\sin(34)}{\sin65}

b=\frac{7.82}{\sin65}

b=8.638 

b=8.6cm 

In the example above, the first step I did was plug in the known values into the formula. I knew this triangle was not a right triangle because it does not have a \angle90. The second step was to isolate the variable and find it’s value.

Cosine Law: The Cosine Law is used when the Sine Law cannot be used. The cosine law can calculate a missing side length or angle. The formula for finding a missing side length is a^2=b^2+c^2-2bc\cos(A). The formula for finding an angle is \cos(A)=\frac{b^2+c^2-a^2}{2bc}.

Ex. \triangle{MKT}, side m is 12 cm long, side k is 7 cm and side t is 13 cm long. What is \angle{K} to the nearest degree? 

\cos{K}=\frac{m^2+t^2-k^2}{2(mt}) 

\cos{K}=\frac{12^2+13^2-7^2}{2(12)(13)} 

\cos{K}=\frac{144+169-49}{312} 

\cos{K}=\frac{264}{312} 

\cos{K}=0.846

K=\cos^{-1}{0.846}

K=32.2 

K=32 degrees 

In the example above I used the cosine law to solve for \angle{K}. The first step was to fill in the values. After that, I solved for \angle{K} by calculating one side of the equation and then using the inverse function of cosine to solve for \angle{K}


Week 16 – Pre Calc 11

This week in Pre-Calculus 11 we finished the Rational Expressions unit. This week we learned about the application of rational equations in real life situations.

Word Problem Basics: Word problems always contain valuable information for solving the problem, so it is always useful to read the question slowly and carefully. To understand the problem better you can create a chart or organize the information in a format you like. Being able to identify key words like greater than (+), less than (-), the sum (x+x), the difference (x-x), the quotient (\frac{x}{y}), the product of (x*y=), etc. These words are helpful to remember when solving a word problem. When giving the answer to a word problem always answer with a sentence and with the units.

Ex. Sally can do all the house’s chores in 55 minutes. When Sally and Jake work together, they can do all the chores in 32 minutes. How long does it take Jake to do the chores?

What We Know: 

From the clues in the word problem we know the time it takes Sally to do all the chores and how long it takes Jake and Sally together to do all the chores. Because they complete all of the chores in that amount of time we know that they complete 100% of the chores, which can be represented as \frac{1}{1}.

The Equation: \frac{32}{55}+\frac{32}{x}=\frac{1}{1}

The first fraction represents the portion which it takes Sally and Jake to do all the chores over the amount of time Sally takes by herself. The second fraction represents the amount of time Sally and Jake take to do all the chores over the time Jake can do the chores. The time that Jake takes to do the chores is represented by x because we are solving for that variable. The sum of both the rational numbers is 1/1 because they complete all of the chores.

Solving: \frac{32}{55}+\frac{32}{x}=\frac{1}{1}

(55x)(\frac{32}{55}+\frac{32}{x})=(55x)(\frac{1}{1})

32x+1760=55x

1760=55x-32x

1760=23x

\frac{1760}{23}=x

76\frac{12}{23}=x 

Final Answer: It takes Jake around 76.5 minutes to do all the chores by himself.