Sculpting the head in Maquette – 2 hours
Assigned maquette is Due Friday, Jan 8
20 marks
You are to work from this 31 minute video showing how to sculpt a maquette of the head. Thanks to “Stecca” for this tutorial. Follow along with the video pausing to complete each stage.
Materials needed: The artist uses a sharp edged metal ruler (you could use a straight bladed knife instead) and a small flat metal paddle – find a similar tool such as a flat blade screwdriver or a flattened wooden chopstick. Keep your clay ball a size that fills your palm.
Follow along with this artist and sculpt your own maquette of a head. There are 10 significant steps, listed below, worth a couple of marks each, totaling 20 marks for this maquette.
Step 1: Begin with a round ball and, using a sharp edged ruler, cuts away the side planes where the temples are. Mark the vertical half line and the horizontal half line which will become the eyeline. Then add the jaw.
Step 2: Now that the jaw is added, divide the face into three equal sections with clear horizontal lines ( measure). Continue the third lines around the side of the head and mark the vertical halfway line on each side (where the ear will go). On the face mark the rectangular box that goes from the center of the eyes place down to the line for the mouth – the video shows the rectangle in red.
Step 3: Mark a diagonal line from the top outer corner of the eyeline -this is the zygomatic bone, shown on this diagram: 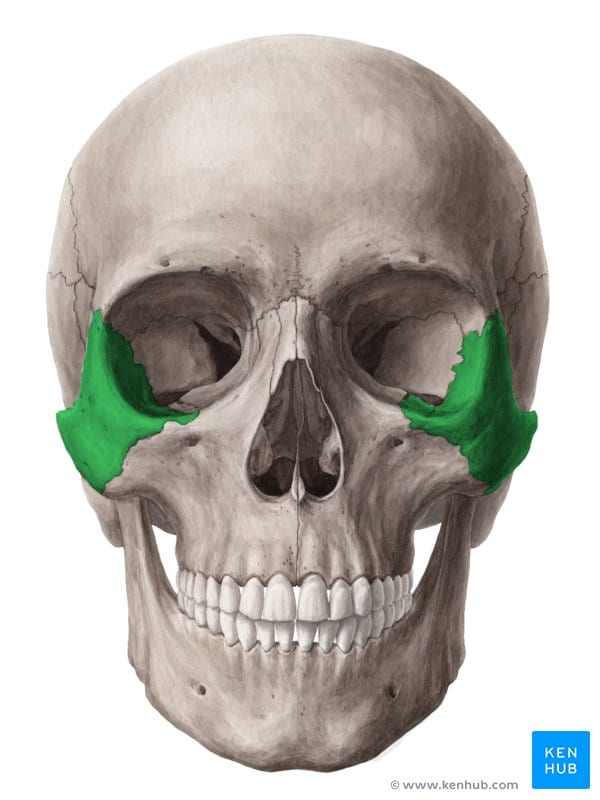
This bone is a major “landmark” when sculpting the head. It is the upper edge of our cheek) to the outer edge of the mouthline.
Cut away this section. Now smooth out the hard edges to soften the face.
Step 4: Cut out the eye sockets. Be sure to leave the zygomatic bone on the outer edge of the eyes. Notice how the brow really overhangs. Trim the forehead a bit on the side – not too much! The front of the face should be narrower now than the back of the head.
Step 5: The nose is a triangular wedge. The length of the nose is 1/3 of the length of the head. The width at the bottom of the nose lines up with the inside of the eyes. Check the side view- the bridge of the nose is either ski-jump, straight, or humped. The nose has wings at the base that protrude around the nostril (the video doesn’t sculpt them in until the end).
Step 6: The mouth: Both the lips protrude out from the face in the center and tuck in at the sides- where they pull in when you smile. The sides of the mouth line up with the center of the eyes. There is a hollow under the bottom lip, separating the lip from the chin.
Step 7: The eyes are round eyeballs set into deep hollows under the eyebrow ridge. The eyeballs do not protrude out beyond the brow – check this from a top view.
Step 8: The forehead, from the browline, is 1/3 of the length of the face. The back of the cranium is high and rounded out towards the back.
Step 9: The neck is long, thinner than the skull and the jaw. The jaw protrudes out farther than the neck. The cranium protrudes out wider than the neck. The sternocleidomastoid muscle descends from the skull, behind where the ears go, down the side of the neck and attaches to the front of the clavicle (collar bone) at the sternum. This muscle is VERY distinct -sculpt it to show up well. The neck at the back is narrower and higher than the neck at the front.
Step 10: The ear is a semi-circle whose top is level with the brow and whose bottom is level with the base of the nose. The center of the ear is a hole that lines up with the end of the jaw, halfway between the front and the back of the head. The back of the ear sticks our from the head far enough to tuck a pencil behind it 😊.
Good job!
Take 3 photos of it – one from front, one from side, and one up under the chin. Send them to me via email for your mark.
If you want to fire and keep this sculpture then stab a pencil up through the bottom of the neck all the way to the very top of the head (not through the top of course) so that any trapped air inside can work its way out as it dries and is fired in the kiln. Carve your signature somewhere so you know that it is yours.