Pre-Calc- Week 11

This week in Pre-Calc 11, we continued on with our quadratic equations. We started inequality’s and how to solve them. We still use the factoring- 1-2-3 method, which is: one thing in common, difference of squares and then the longer way of doing the box or decomposition.

An inequality is a symbol that shows if the expression is greater then, greater than or equal to, less than and less than or equal to zero.

When doing an inequality you’re trying to show where the parabola is either greater than 0, or less then depending on what the inequality sign is. The x axes is split into three parts by the parabola. It is good to draw out something like this when you’re doing the inequality so you can see where it is above or below zero.

Now I am going to show you have to solve an inequality.

Step 1: When you first get your equation, get your zero pairs. Just like you would do to find the x-intercepts.

Step 2: Draw a X axes and put your numbers down. Next draw a parabola so you can see what is going to happen. In our example you can see it is asking where is it less that or equal to zero. So I know by just my drawing it is going to be in section three.

Step 3: Next write out your equation without putting int he symbols yet. You know that x is somewhere in between -7 and 2, that is why you write it out like that.

Step 4: Now we have to put in our symbol. And how you do that is you know for x to be in the middle section it must be greater than or equal to -7, because if it was less than it would be in section1, but it has to stay in section 2. And x must be less than or equal to 2. And same thing, if it was bigger than 2 it wouldn’t be in the middle section anymore.
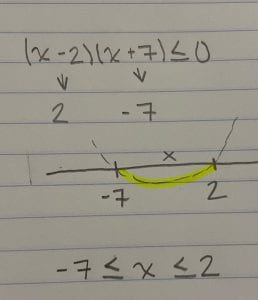
And I just wanted to show what it would be if the question was (x-2)(x+7)>0. This would be different because this is where the parabola is above zero. So section 1 and 3. And for it to stay in section 1 x has to be less than -7, and for 2 to stay in section 3, x has to be greater than 2.

In my opinion, drawing out the picture really helps. Without it I can’t really visualize what is happening but once you draw it out it becomes very clear, what is happening.

Pre Calc 11- Week 10

This week in Pre-Calc we finished up our quadratic functions unit. In this blog post I am going to show how you can look at a graph and figure out the equation. For this blog post I am going to focus on how to put it into the vertex form of the equation.

For this blog post I am going to use this graph as example:

Step 1: So to start off with I am going to look at the vertex.  I know that my x value of the coordinate (5) is going to be inserted into the equation, In the position (x-5). But we need to flip the sign to negative. If we started with a negative it would flip to positive.

Step 2: Now I can take my 2, from the y part of the coordinate and add +2 after my bracket, to show it is going to have a vertical translation of +2 when you graph it.

Step 3: We have inserted all of the information we can from our vertex, we are going to need to use the given point to find our stretch. To do this we have to insert the x and the y values from our coordinate into the equation where there is an x or a y. So in this case our coordinate is (3,-2). so the -2 is going to replace y=, and the 3 is going to replace the x in the bracket.  But if you go back and look at the original graph, it was congruent to the parent function, meaning there isn’t a stretch.

Step 4: The final thing we have to do is notice the parabola is a maximum so there has to be a negative out front of the bracket.


I’ll do an example on how to find the stretch. Let’s say we found the first part of our equation and the points given to us are, (-1,-13).


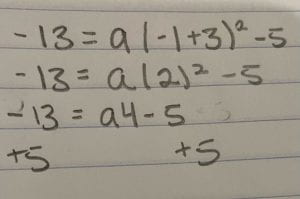
Step 1:  The first step is to insert our x and y values, like I explained above. Put the -1 in where the x is, and -13 where y is. I am going to put a in front of our bracket to represent the stretch.

Step 2: Now we have to solve this equation. I am going to start with inside the bracket and clean that up.

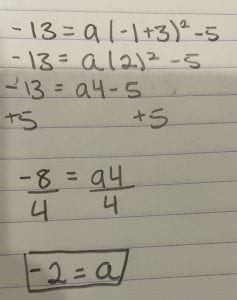
Step 3: Now I am going to square the 2. And add 5 to both sides to get rid of the -5, as it can’t be added to the 4a.

Step 4: My final step is to divide -8, by 4 because I have isolated the variable. When I do this I can see my parabola has a stretch of -2.

And that is what you need to know on how to look at a graph and put it into vertex form.

Pre-Calc- Week 9

This week in Pre-Calc 11, we continued with our analyzing quadratic equations unit. We learnt how to take each equation and write it in standard form, because the way they gave us the equation isn’t helpful to graph it but putting it into standard form makes it possible to graph it.

Example:

Step 1: The first thing we have to do, is make the x by itself, for it to be possible to complete the square. How we are going to do that is take the greatest common factor out of the first two numbers, a way to remember which numbers you take it out of, is if it has a x. In this case I am going to pull out a 2 and that leaves me with x^2 and 4x inside my bracket and we can see the -4 wasn’t effected and stays outside of the bracket.

Step 2: The second step is to find our zero pair we need to add into our equation. How you do that is take the number in front of x, divide it by 2 and then square whatever number you get. That can seem like a lot of work but in this case, you have 4. Divide that by 2 and you get 2, 2 squared is 4. And then you have to add in a zero pair, meaning you need to add +4, -4 into the brackets.

Step 3: Now I need to get my -4 out of the bracket. But to do that I need to multiply it with the 2 out front of my bracket. And the combine my -4 with the -8 I will get when 2 multiplies with the -4 from inside of the bracket.

Step 4: Our final step is to fix our bracket. You’re going to go back to the number you got when you divided it by 2 and put that into your bracket. In this case when I divided 4 by 2 I got 2, so that is the number I am putting back into my bracket and everything in this bracket is positive therefor it’s going to be +2, but if the number was negative you would put -2. It depends what is in the brackets you’re starting with.

Once you get your equation into this form it is ready to graph. In my opinion the most important step is when you’re adding in your zero pair and that is where I would go back and double check you did it correct because if not it will mess up your whole equation. But that is it! All you need to do now is identify the clues I talked about in my last blog post and graph this.

Pre-Calc 11- Week 8

This week in Pre-Calc 11 we finished up our quadratic unit, reviewed for our midterm and started our analyzing quadratic equations unit. Although we haven’t gotten to in depth about this unit yet I am going to focus on the few things we have learned. In this blog post, I am going to show how to analyze a quadratic equation and what the equation can show us without even doing any solving or anything.

First of all, what is a quadratic equation? Compared to a linear equation? A quadratic equation is an equation with a degree of 2, while a linear equation has a degree of 1.

Let’s take this quadratic equation. There are certain things you can already know about this equation without using a graphing calculator or any other thing like that.

Y-intercept: The Y-intercept is where the line (s) touch the y axes. Without doing any graphing I can see that the Y-intercept in this equation is going to be 5. The Y-intercept is always the number in the equation without a variable.

X-Intercept: The X-intercept is where the line crosses the X axes. In this case when we graph it we see there is no X-intercept because the parabola never crosses the X axes.

The coordinates of the vertex:  The vertex is the bottom or top part of the parabola. So you can see in this case the coordinates are (2,3) because that is the lowest part of the parabola.

The equation of the axis of symmetry: The axes of symmetry is an invincible lines going right through the middle of the parabola. If you look at the graph you can see, if a line went right through the middle of it down to the X-axes it is going to be x=2.

The domain of the function: As you can see the domain is the restrictions on the X axis. But if you can see X can be anything. The parabola can go on forever. Therefor, XER, because x can be any value and be true.

The range of the function:  The range is the restrictions on the Y. As you can see the Y doesn’t go and can’t go lower than 3. So X≥3, because it can’t go down any lower than 3.

Those are a few simple things you can know about your quadratic equation before solving or doing any real work. One thing i’ll add is the x^2 value is + the parabola will be minimum, but if the value is – the parabola will be maximum, meaning it will open-down.

Pre-Calc -Week 7

This week in Pre calc 11we learnt the quadratic equation. This, after factoring is my favourite method. The equation may look complicated but when you can identify what a,b,c are it is actually just a matter of inputing the numbers in the right place.

This is the quadratic equation. 

This an example of what a,b and c are going to be in the equation.

Now that you have the formula and know what goes where all you have to do is input the numbers and solve it.

Step 1: I started off by labeling a b and c so I don’t make a mistake when inputting the numbers into the formula.

Step 2 : In this step I am going to insert my numbers into the formula. Once I do this step all I have to do is solve this equation.

Step 3: In this step I started solving. I cleaned up inside the square root by squaring (-10), and then I multiplied (-4)(1)(7), which come out to be a negative. I multiplied my coefficient (-10) by (-), which gave me a positive 10. And multiplied (2)(1).

Step 4: In this step I just subtracted 100 by 38 and it gave me 32.

Step 5: Now I am putting 32 into a mixed radical because it can be broken down further (it has a perfect square inside of it).

Step 6: The final step is to reduce this, if possible. If there is a common number, like 2 in this case, you can divide all the numbers by it

.

That is all you have to do. As long as you do the first step correctly all you have to do is solve an equation. If you were to end up with a perfect square under the root, then you would know that the question was factorable.


Week 6- Precalculus 11

This week in Pre-Calculus 11 we started doing quadratic equations. A quadratic equation is an equation that has a degree of 2. When a quadratic equation equals 0, your final answer has to be x= and whatever number would make x=0.

This is a simple question, it is already in its factored form. I can easily see that for x to equal 0 in the first bracket it must be -5. And same with the second it must be -8, nothing else would work.

Sometimes they will give you an equation that doesn’t equal 0. In that case you would need to move that number to the other side of the equation and make it equal 0. When you do this the sign on the number changes.

Step 1: The first step is to move 27 to the other side of the equation making it -27 and the equation = 0.

Step 2: Now, we need to factor this equation and get it into two brackets. This is a simple 3-term factoring, the third part in factoring 1-2-3.

Step 3: The final step is to write out what would make the brackets equal to 0. So by factoring this we have got it down to the simple question we saw in the first equation.

That is all you have to do! Just remember to always make your equation equal to 0.

Week 5- Pre-Calc 11

This week in Pre-Calc 11, we started our “solving quadratic equations”. We started off by reviewing and working on our factoring skills. In this blog post I am going to focus on how to factor a trinomial using the box method we have worked on throughout grade 10 and grade 11.

Essentially factoring is breaking an equation down to its prime form where the numbers now have nothing in common and can’t be broken down anymore.

Step 1: Write out your product and sum. How you get your product is multiplying the last number with the first, so in this case 5 and 3=15. And your sum is the middle number. Writing it out helps you not have to do so much mental math, which is where you will make errors.

Step 2: In this step you are going to determine what two numbers multiply to equal 15, but add to equal 16. So essentially what ever multiplies to equal your product needs to add to your sum. In this case 15×1=15, while 15+1=16.

Step 3: Now you’re going to draw your box and place the numbers in. The 1x and 15x doesn’t matter if they switch but the 5x^2 and the 3 need to be in the positions you see them in.

Step 4: Now you to determine what numbers you can put on the outside of the box that would multiply and give the product in the box. Sometimes this take trying out some numbers and then needed to change them before you’re done.

Step 5: This is your final step and it is writing out the final factored form of the equation.

And that’s all. A way to double check you did everything correct is to solve this factored equation and it should equal the equation you started with.

Pre-Calc Week 4

This week in pre-calc we finished up our roots and powers unit and started up our radical and operations unit, which is just growing off of what we did in our powers and roots unit as we are still using mixed and entire radicals and many other skills from that unit.

In this blog post I am going to explain how to add and subtract roots. I find this very similar to adding and subtract fractions, as when adding fractions you must have the same base, well in this case you must have the same radicand and just add the two coefficients.

Step 1: The first thing you’ll notice is that in this example the radicands aren’t the same. But I notice that they’re all perfect squares so I am going to pull out the perfect square and put it out front, now it is the coefficient.

Step 2: Now I notice all of my radicands are the same I am simply just going to add/subtract my coefficients. If this were a more complicated questions there could be some simplifying I have to do but in this example this is the final step.

Sometimes you have to put your radicand into a mixed radical to get the same radicand. I will show how to do that now.

In that example you can see I followed the same steps but I put them into mixed radicals. I then added the like ones and got my answer.

For adding and subtracting radicals you just have to remember to make them alike and if they can be alike then you just leave them.

Pre-Calc 11- Week 3

This week in math we had our first unit test and started our second unit, which is radical operations and equations. In this blog post I am going to focus on how to add or subtract roots.

When adding or subtracting it is like simplifying variables- add like terms. So when you’re simplifying variables you can’t add a with b, it just doesn’t work. And that is the same thing we see here. The numbers in the square roots must all be the same to be able to add them.

I will do 2 examples. Once you see it it will be pretty easy to catch onto.

That is our example question.

Step 1: The first thing I am going to notice is that everything inside all three roots are alike, meaning we can add them together.

Step 2: This is the final step. Just add together all the coefficients and leave the base the same.

We will do a harder questions which take some simplifying to be able to gather like terms.

As you can see in this example I cant see any like terms, so what I am going to try to do is simplify it. How I am going to do that is try to see if any perfect square numbers are a factor of it or divide into it and then just simply making them into a mixed radical.

Step 1: The first thing I am going to do is see if I can break these numbers down into some perfect square numbers. I like to put them on top of the square root it makes it easier to see for me.

Step 2: In this step I am going to write my prime factors down into mixed radicals, exactly like we did last unit and now I can see I have the same base in all of them and can subtract them now.

Step 3: In this final step I am simply just subtracting all the coefficients.

And that is all you need to know. My advice would be to make sure you get your square root numbers right to make sure you do everything else right!

Pre-Calc 11 week 2

This week in Pre Calc 11 we looked at different things. In this weeks blog post I am going to explain how to do mixed radicals.

When doing mixed radicals I prefer to make a factor tree. It helps me be able to visualize it and easily see what my perfect square, cube and so on is going to be without having to do very much work. I find that when putting bigger numbers into a mixed radical a factor tree helps me keep my questions organized so when I look back at it later I am easily able to identify what I did.

Step 1: When you get your question the first step is to break it down into its prime factors. As you can see I broke down 108 all the way down to it’s prime factors via a factor tree.

Step 2: The second thing I do is take my prime factors and put them in a cubed root. I then circle my groups of three numbers, what I mean by that is because there is three three’s I know that is going to be a perfect cube.

Step 3: In this final step I pulled out the three. The three came from the three 3’s multiplied together but because they’re in a cubed root they’re going to equal 3 anyways. And as you can see there is a 4 inside the cubed root. Well that 4 comes from the two left over numbers, which in this case happens to be 2 and 2 so when multiplied together gives us 4.

Tip* Don’t forget if it’s a cubed root and fourth root and so on to make sure you put the little three or whatever it is on the square root.

It’s that simple! Just three simple steps. I will do one more example.

In this example you can see I followed the same steps, the only difference was that at my second step I needed to see 4 of the same numbers because it was a fourth root.

And that is all you need to know for mixed radicals. The last thing I am going to add is if at your second step, if you needed a cubed root and you didn’t have three of the same numbers that mixed radical wouldn’t work and your answer would be “not possible”. Just remember these three simple steps and you will be good!