Luminary Project Process: Journal Entries

Week 10: November 8th, 2021

This week, I have made a sketch of the sculpture I would like to create for my luminary project and I have found 3 inspiration pictures.

I came up with the concept of my sculpture by using the lyrics of a song I have composed.


“There was a time we were afraide of the dark,

We thought it was caused by the monsters.

But the truth is not that easy to find,

Since we were scared of the unknown.”


I wanted to represent the shapes that I used to make out in the dark when I was little. I would see a pile of clothes as a monster. I amd putting this idea together with the fear I have now, my futur.


This sketch shows what my sculpture will look like in the light. It is a monster hiding under covers to simulate what I would see when I was little. I will be making it hollow and out of clay. I chose to make the monster exagerated and childish and I will be using bright colours to show how what once was scary is now unrealistic.


This sketch is what my sculpture will look like in the dark and illuminated. When sculpting the monster, I will make the flower detailing as slits so that the scource of the light from the inside can shine through. The flowers are supposed to represent how I am still learning and blooming as I am growing up. The swirly branches represent all the different paths and options I have. I take the scary parts of the monster and make them into something inviting. For example, the teeth turn into large leaves coming out of the bottom of the flower.


My Inspiration :

I chose these three pictures from the website : https://sass3journey.com/2016/12/18/create-your-own-starlight-chamber-through-the-beauty-of-luminary-pottery/


5-lmnrys


I chose this picture because I like the use of different simple shapes to make other shapes, like swirls. It is also using the same light source as my design.


circles-luminary


I chose this picture because of the different size holes it used as well as the wave shape it created. I am going for something similar with the flower shapes I am making and this gives me a good idea of what it could look like visually.


I chose this picture because of the beautiful light the sculptures cast onto the wall. I now want to try and see if my sculpture will project the flower lighting that I will be making.

My goal for this week is to plan what three prototypes I will be making and to start on one of them.


Week 11: November 15th, 2021

This week, I have started on the clay prototype for my luminary project, prestented my art movement presentation, and I have made small creations for other art movement presentations.


I made this small pot to make the design on for my clay prototype. I used the pottery wheel, after not using it for 5 years, and I had to learn how to operate it again. It was challenging, since centering it was hard and the clay would fall off when I would try to shape the pot. I might make another pot after tying to carve this one, because I want the product to be more even.


The two images show a part of a mandala I made on clear plastic and a geometric shoe I made to recreate a real one. These were fun mini projects to do, since I got to challenge mysekf to draw on different materials and to draw in different art styles.

I almost met my goals for last week, because I started on my clay prototype, but I still need to plan another prototype. I decided to make my paper prototype with the cricut machine.

My goal for this week is to carve my pot and to start on the cricut design. A bonus would be to make another pot.


Week 12: November 22nd, 2021

This week, I have made a new pot, carved both my clay prototypes for my luminary project, designed my cricut mandala, and I have made a new small creation for art movement presentations.


I carved my first pot after leaving it for a weekend and a few days. It was dried up so everytime I made holes in it, other parts would fall off. After seeing most of my design fall off, I decided to make a new pot. I made it using the back of a measuring cup as a mold. I then decided to carve it on the same day, so that the clay would still be soft. I am not sure if the light will project the way I want it to, since the angles of the holes are different, and the clay would clog up the holes from the inside.


This abstract painting is made by using different colours of paint and marbles moved around in a cardboard box. I made it in a group of 5 people and we each took turns to swirl around the marble and paint. This resulted in the abstract pattern shown.


The design of my cricut is a mandala, resembling a flower, so that it is related to my final project’s theme. I need to make adjustments, since the lines are touching each other. This makes it impossible to execute the design the same because each pattern would fall off.

I met all of my goals, including the bonus one last week. I carved my first pot and made a new one, which is carved much better than the other, and I started on my cricut design.

My goal for this week is to paint my pot, to fix the cricut design, and to start on my recycable prototype.


Week 13: November 29th, 2021

This week, I have painted and glazed my pot, almost finished my recycable prototype, fixed my cricut mandala design, and I have made small creations for art movement presentations.


I tried painting my pot with underglaze in a way that would make it resemble a flower more. I also tried following the pattern of the holes. The challenge with glazing it was unclogging the holes, since the design I made got covered with the thick glaze.


The first picture is a sculpture made from plastic balls. Our goal was to turn the items into a new creation, so our group decided to hot glue the balls into a Christmas tree. The second picture is made from pieces of paper thrown onto the paper base and glued down in their exact position. This was to use the randomness of the drop of the papers to create something interesting. The third picture is a drawing of a vending machine. Our task was to recreate the picture of the vending machine as realisticaly as possible in the short time we were given. The last picture was using geometric straight lines, shapes, and different colours to create an interesting design.


I fixed my cricut design by adding spaces in between the lines so that they were no longer connected. This was important since the design used to be impossile to cut out in one piece. I am still not sure if the design will be cut out the way it was drawn by cricut, which means there might be more adjustements to make.


I started off my recycable prototype by re-painting a black box as the base. I then glued gold paper to the bottom and top sides of the inside of the box to be used as a reflective surface. Afterwards, I taped fairylights along the inside of the box and I made origami stars. I added in the stars by making garlands with a needle and thread and sewing them in to the sides. There are still some garlands left to make since it is the most time consuming part of this project.

After almost having finshed the pot, and working with luminary concepts, I have realized that I do not like my original  final luminary project design. It will be impossible to have complicated designs since the clay will just fall off and the light will not be disperesed evenly.

I met all of my goals, since I painted and glazed my pot, fixed the cricut design, and almost finished my recycable prototype.

My goal for this week is to finish my pot, and to work on re-making my final luminary project design.


Week 14: December 7th, 2021

This week, I have finished my pot and I have made a new design for my final luminary project.

I was not the expecting the colors to be bright red and blue in the end result, since the underglaze looked different before being put in the kilm. The light —. This prototype helped me realize that the final project’s original design will not work as well as I thought it would, because of the limit in adding details and the dispersion of the light.

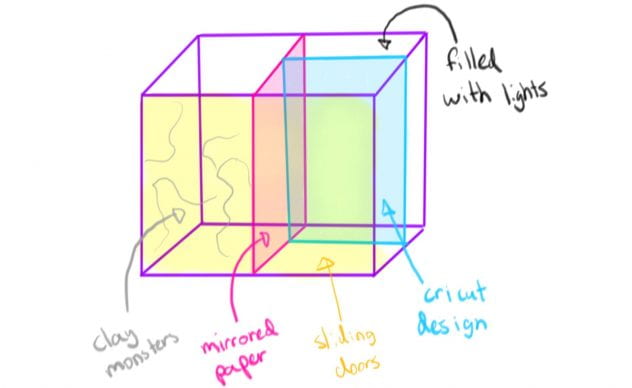
My new idea for the luminary project is to have a closet with an illusion of having different things inside every time the doors open. I will achieve this by using sliding doors and a divider in the middle. The divider will be covered with mirrored paper, making the inside seem spacious and giving the illusion of both sides being open. I will still used the lyrics of my song and have the same concept of monsters in the dark and the blooming flower. One side will have monsters made of clay and the other will have a cricut design covering light. The cricut design will let the light out only through its holes, making the flower glow and the other side dark.

I met all of my goals, since I finished the pot and I redesigned my final luminary project.

My goal for this week is to finish my recycable prototype and to start using the cricut.


Week 15: December 17th, 2021

This week, I have finished my recycable prototype and I have worked on the cricut.

I finished the recycable protoype by adding in the last rows of stars and by taking pictures of it in the dark. This prototype was a great experience to make since I got to be creative and put together an art form I already know, origami, and materials I have not used before in an art project, like gold paper and fairylights.

I used the circut machine to draw out my mandala design on cardstock, leaving one side left to the lantern. I am planning on using folding this paper in three, to have the design be visible all around and to have one side with light shining through clearly. I desided to cut my design in half because it inlarged all the little details that would have been lost if they were drawn smaller.

I met all of my goals, since I finished the recycable prototype and I have used the cricut machine to draw out my design.

My goal for the week after the break is to finish the lantern and to start on the monster side of the final luminary project.


Week 16: January 17th, 2022

This week, I have finished the lantern and I have sculpted the closet’s monster side.

The first step to finishing the lantern prototype was by choosing a simple design I wanted to cut out of vinyl. I had decided with the librarians that making a simple silhouette of a flower in one piece would not be possible without it looking to dark and plain, which lead us to change the plan to apply vinyl to baking paper and to use it to hold everything together. After cutting out the vinyl, I had to use tools to seperate the unwanted parts and I had to transfer the design using transfer paper. This lead us to a new problem where the vinyl would not stick to the backing paper. In the end, I stuck it to tracing paper and glued it to hold the folded stock paper sides together aswell.

For the monster design, I decided to sculpt a sculpture that does not resemble a specific shape. It is meant to show how our fears blend and mix together to create nightmares and monsters. The most significant part of the sculpture is the eyes, since it resembles the peering monsters we would see in our closets as children. The sculpture has been put in the kiln ad is now ready for underglaze and glaze.

I met all of my goals, since I finished making the lantern and I have made the monster sculpture.

My goal for the last week of this semester is to completely finish the luminary project and to work on my bonus project in the remaining time I have left.

Ticking Exhaustion

Ticking Exhaustion is a mask made to show how I hide my exhaustion from everyone by exaggerating my hidden features. The mask I have created showcases how I conceal the consequences of my fatigue by being bubbly and trying to maintain a perfect image. 

My exhaustion is from over-thinking and the pressure created by the lack of time I have as a student, hence why there are gears and a clock. My attempt to hide how tired I am is shown in the exaggerated cartoon eye. My unseen side is also shown by exaggeration, but it is worsening the negative effects of fatigue and it is painted directly on my face. I chose to make the mask look like a doll by painting cracks resembling porcelain so that I could show how I always want to maintain a perfect image. I made the clock, gears and chains look metallic to symbolize the solid grasp they have on my lifestyle. Lastly, I chose to use face paint to show that the eyebags and weariness are my real side, hidden under the mask. 

Term-Long Inquiry Process – Journals

Tuesday October 5th 2021 In this past week, I have sketched the design of my term-long project, planned out its concept, and decided on the materials needed.   The picture above shows the design of my sculpture and it contains the symbolism of the aspects I have chosen to include. It also lists the materials I will need to use. My sculpture is meant to represent our imagination and sense of liberty fading away along with our childhood. The fairy represents my imagination as I child, since I used to believe in them when I was little, and the darkening bubble is meant to represent how it faded away with time. I got a lot done in the past week since I have laid the foundation of my project. A challenge I faced was drawing my design 2D, because it wouldn’t show all the angles. I overcame this by drawing my design from an angle that showcased most of the important details and one that would allow me to visualize my sculpture properly.  I now know my goal for the end product thanks to design. My goal for this week is to learn more about resin and to have a better understanding of the product.


Tuesday October 12th 2021 In the past week, I have done basic research about resin to decide whether or not it is a good product to use on my project. I now know that the easiest way for me to make the wings and the bubble for my fairy is by using a mold, but I will not be able to freely shape it like I would with clay. I also now realize that resin requires good ventilation and it can be hard to use for  beginners. I would also need to buy different types of resin and combine them in order to get the product that I want. In conclusion, resin is not the ideal material to use for the bubble wings of my fairy sculpture. I have accomplished last week’s goal, which was to research on resin. My goal for next week is to solve my problem with resin by replacing the material I will be using for the wings and bubble.


Tuesday October 19th 2021 This week, I have discussed with my art teacher, Mx. Vittie, the different material I could use for the wings of my sculpture. She has shown me some fabric and wires I could use to make an effect resembling the transparency of fairy wings. I could use thin iridescent fabric shaped with thin wires as armatures. For the bubble, I could use a marble and paint it if necessary to give it a darkening effect. When planning the clear parts of the sculpture, I realized that a foil and wire armature would not work with clay, since it would explode in the kiln. I met my previous goal by discussing with my teacher and brainstorming different types of materials I could use to replace resin. My new goal for this week is to think of a way to solve my armature problem.


Tuesday October 26th 2021 In the past week, I have finished making my mask, giving me time to work on this project next week. I have also solved last week’s problem of the armature and clay by talking to my teacher and realizing that the best option is air-drying clay. Air-drying clay will allow me to use any material as the armature, since it will not get damaged in the drying progress, and any paint material. I find acrylic easier to use compared to under-glaze, since I can distinguish the colours more easily and I can pay more attention to details. I have met last week’s goal by finalizing the materials I will need to use on this inquiry project. My goal for next week is to make the armature of my sculpture.


Mask Process: Journal Entries

Week 3 : September 20, 2021

During the past week, I have experimented with armatures and plaster for my mask.


The three pictures were taken when I made mask armatures out of paper. The process was simple, since I had to cut, fold, and tape the pieces on the templates. However, the results were not sturdy and anatomically correct. After having built the two paper armatures, I have come to the conclusion that they will not work well with my mask’s design.


This picture shows a finger made out of plaster, which I made by wrapping small plaster strips around my finger while applying water. The process was time consuming, since the water had to dry before taking the plaster off, and the final result was fragile. In the end, the material was interesting to use, but I find it to risky to use for my mask.


My goals for the week were to finish my mask’s design, to experiment with materials, and to gather all the materials needed for my mask. I exceeded my expectations since I accomplished all my goals and I also started on the first layer of my mask! I used the information I gathered from testing out the different materials to realize that papier mâché would work out the best. I ended up using cellu-clay for the first time instead, and I applied it on a store-bought mask armature for my first layer. I have all my materials (a mask for the armature, a plastic dome and fake eyelashes for the eye, and a watch for the clock) ready for me to work with when completing my mask. I would not change anything about the past week because of my fast-paced progress.


My goals for this week are to add another layer to my mask and to finish the writing on my slide in the collaborative PowerPoint.


Week 4 : September 27, 2021

During this week, I have made started to make a clay mask and I have continued to work on my main mask.


So far, I have finished structuring most of the face’s shape and I have only need to smooth it out and add details. This was my first time making a sculpture solely focusing on a face and I have learnt new techniques involving clay and anatomy. I know know how important it is to have the armature and clay covered in moist paper towels when storing it in order for it not to dry out, and I also realized the similarities between drawing an sculpting with anatomy.


My main mask has had steady progress since I have already finished my design, gathered all the materials, made the first layer, and started working on the chain and gears. I can now start on the second layer and cleaning up the cracked edges. After trying it out, I realized that the mask needs to be a little bit smaller and that I need to start building up the nose and lip details for the painting stage.


These pictures show my progress on the chain detail of my mask. I bought a chain from Home Depot and used spray paint to give it a brass colour. This will help me achieve the steam punk style that is mixed with the venetian base of my mask.


My goals for the week were to add another layer to my mask and to finish the writing on my slide in the collaborative PowerPoint. Since I was too busy working on the clay mask, I was not able to add a second layer, but I have still made progress with the chain and details. I have also presented the collaborative PowerPoint about my mask inspiration and finished its writing.


My goal for this week is to finish sculpting my clay mask and to add a second layer to my main one.


Week 5 : October 4th, 2021

During this week, I have finished sculpting my clay mask, I have added two more layers to my main mask, and I made my personal definition for art.


I finished adding eyebrows and cheekbones as well as refining the lips on my clay mask. I used the scoring technique when attaching pieces like the eyebrows and I used a tool to smooth out their edges and too add detail. I finished it off by smoothing out all the small cracks with water and cutting off the excess. Now, all that is left to do is to bake and paint it.


I added two layers to my cellu-clay mask, one for smoothing out the base, add support, and to prevent chipping, and the other to add lips, a chin, and to adjusting the eye. In order to finish the base, I need to refine the nose and to sand out the surface for a smoother base for paint.


Today’s activity (Monday October 4th) was to define art. We could apply our personal perspective as well as different art forms.


My goals for the week were to finish sculpting my clay mask and to add another layer to my main mask. I have completed my first goal, since I now only need to bake and paint my clay mask. I exceeded meeting my second goal because I have added 2 layers instead of one, which means I have made most of the facial features on my mask and that I can finish my base by the end of this week.


My goals for this week are to finish the base of my main mask and to paint my clay mask.


Week 6 : October 12th, 2021

During this week, I have painted my fired clay mask, painted most of my main mask, and I started making a gear as an accessory for my mask.


I painted the cheeks, eyeliner, and lips. I also attempted to paint cracks but I will make them again in a more realistic style. Other than the cracks, I only need to paint the eye.


I made a gear out of cardboard and painted it to have more depth and a metallic look. I made the bumps and the line in the middle with a glue gun. I will need to add another layer of gold and copper colour to the gear to make it look more metallic.


I painted a base and details on my clay mask. It was challenging to paint it since the colours were limited and it was my first time working with the media. I had to mix paints to achieve the colours I wanted and they would change when the paint dried.


My goals for the week were to finish the base of my main mask and to paint my clay mask. I exceeded my first goal, since I already started working on the gear of my mask and I have almost finished painting everything. I have also painted my clay mask, meeting my second goal.


My goals for this week are to finish my making mini clay mask, finish the gear, and to repaint the cracks.


Week 7 : October 19th, 2021

During this week, I have finished making the gear, repainted the cracks on my main mask, and I have glazed my clay mask.


I have repainted the cracks by using brown and black to add more depth any by watering down the paint. Watering down the paint, using a thinner brush, and turning the brush while maing strokes helped me achieve a more realistic look with more detail. I also started painting the eye by adding highlights and the pupil. In order to paint on the clear dome I have made, I need to work backwards and paint over the things I did last.


I finished the gear by adding gold and bornze paint to the parts I wanted to make pop the most and by finishing it with gold dust. Now I have all the materials I need to add on the mask other than the frame of the clock.

My goals for the week were to finish making my mini clay mask, finish the gear, and to repaint the cracks. I have met all my goals and I have even started on painting the eye, so I am ahead of what I thought I would complete.

My goals for this week are to finish my mini clay mask, and to paint the eye on my main mask.


Week 8 : October 26th, 2021

During this week, I have finished making the eye, finished my clay mask, and glued on the gears and earings to my main mask.


I painted the iris and the white of the eye working on a layer each day while letting it dry t night. I also glued on eyelashes and trimmed them to make it look more even and doll like. Finally, I glued on the gears and earings by layering them to create depth.


The outcome of my mask was suprizing, since the underglaze’s colur changed a lot in the kiln. Making this clay mask was a good experience since I focused on sculpting a face and I used underglaze and glaze for the first time.

My goals for the week were to finish my mini clay mask, and to paint the eye on my main mask. I completed all my goals and went beyond expectations by gluing the gears and eyelashes to the mask.

My goals for this final week is to finish my mask.


Week 9 : November 2nd, 2021

During this week, finished making my mask and photographed it.


Link to post with artist statenent and more pictures

Link to Art Gallery

I finished making my mask by making a frame for the clock and by gluing on the chains. I made the frame out of coarboard and I painted it in the same way that I painted the gear. I had to take apart the watch and to incase it with a different frame in order for it to be thinner and in a steampunk style. I then glued on the small copper chains under the gears and glued the big spray painted chain on the edge of my mask.

I first photographed the mask by itself to get all its details in even lighting. Afterwards, Angelina Sharma photographed it as I modeled it with face paint. Angelina added more depth to the picture by adjusting the lighting and backdrop, making the picture more sinister.

I used facepaint on the exposed part of my face to accentuate the fatigue the mask is trying to conceal. I used black, brown, purple, and red face paint to exagerate features making my face look sickly and exhausted. I also rested my face and dropped my eyelids to achieve a sleepy look. The hand on the side of my mask is holding it up in a elegant way while the hand on the side of my face is clawing at it, giving the empression of hating on the real side.

After having finished this project, I have learnt more about art and myself. I can now visually see how bad my sleep-deprivation is mentaly and physicaly to some extent. I have also learnt how to use new materials, including cellu-clay, while completing the mask.