Archive of ‘Grade 9’ category

Climate in Canada: West Coast

For this assignment, I was given the task to depict The West Coast. In my picture, I have included the 4 different spheres which are, Atmosphere, Geosphere, Hydrosphere and Biosphere. The West Coast region included the province we live in which is British Columbia. British Columbia is known for its beautiful scenery like mountains and lakes. I wanted to show that. The main challenge of this assignment was utilizing the Carbon Cycle and representing the biotic and abiotic factors in my region.

Biotic Factors: Bear, Deer, Beaver, Fish, Trees, Fossil Fuel

Abiotic Factors: Cloud, Sun, Soil, Rocks, Water, Air

My picture has represented all the things I have listed above and included the Carbon Cycle with gigatones.


Fossil Fuels such as Coal and gas are huge contributors to climate change worldwide, they take over 75% of the global greenhouse emissions, 90% of which is all Carbon Dioxide emissions.

Causes of Warming Climate in West Coast:

The thing that is causing the Warming climate is actually the nature. These are natural changes in the wind that don’t involve the humans. They are responsible for the warming on land and sea that is along the West Coast of North America.

Other factors like manufacturing goods, generating power and transportation are big contributors to the climate change in the west coast. TO make items like cement and steel, the manufacturing industry creates a lot of harmful emissions. Mining and other instrudies also release these harmful gases. All the machines used in the process require coal, oil or gas. Excessive use of this can be dangerous. Plastic is another cause to these greenhouse emissions. The reduction and control over the manufacturing industry can significantly bring down these emissions.

The more transportation you use, the larger the carbon dioxide emission is. The majority of carbon dioxide emissions related to energy come from transportation. In addition, statistics suggest that over the next few years, energy use for transportation will rise significantly.

Effects of Warming Climate in West Coast:

Rising Sea levels, Rise in temperature and reduced snow are just a few effects due to the warming climate change. The high temperatures are quite noticeable in B.C. This is because as greenhouse concentration rises, the global surface temperatures rise too. Reduced snow is another problem as it is the natural provider of water. Less snow affects water availability resulting in less water for agriculture and ecosystems. It also increases sea levels due to the melting ice sheets. This could lead to the endangering inhabitants on islands and in coastal areas.

There are several factors causing these unfortunate events. If we work together as a community and take simple measures to reduce our carbon emission, we can gradually d=fix these issues.

Sources:

West Coast warming linked to naturally occurring changes – Los Angeles Times (latimes.com)

Causes and Effects of Climate Change | United Nations


Meiosis in Minecraft

Maia and I have represented meiosis using Minecraft. Our goal was to educate our viewers and teach them more about the process of Meiosis using creative tools on Minecraft. We created a fun video that describes all the steps of Meiosis.

Our video:


Modelling Mitosis

  1. Prophase
  • Interphase: Interphase is the longest cell cycle and it is when your cell performs normal functions and grows. During the interphase, the cell receives nutrients and creates and uses protein. An example of interphase is an intestinal lining cell absorbing nutrients.


  • Early Prophase: In the process of early prophase the nucleolus disappears and spindle fibres form. the spindle is a structure which is made up of microtubules. This is part of the cell’s skeleton. Its task is to organize the chromosomes and move them around during mitosis. In this phase, the chromosomes also start to condense making it easier to pull apart in later stages.


  • Late Prophase: The mitotic spindle in this phase begins to organize all the chromosomes. The chromosomes from the previous stage have become even more condensed making them compact. The spindle fibres attach to centromeres of chromosomes. The spindle grows bigger and some of the microtubules start to capture chromosomes.


  1. Metaphase
  • This is the stage where all the chromosomes have been captured and line up at the middle of the cell, ready to divide. All the chromosomes align on the Metaphase Plate. In this stage, two Kinetochores of each chromosome attach to microtubules from opposite spindle poles.
  • After all this there is another important step. The spindle checkpoint makes sure to check if all the chromosomes are on the metaphase plate with their Kinetochores attached to the microtubules. This is extra precaution so that the two daughter cells separate in the next stage.


  1. Anaphase
  • The sister chromatids are separated from each other and are pulled to the opposite ends of the cell. The protein that holds the sister chromatids is broken which allows them to depart from each other. Each is now their own chromosome and settle at the opposite ends of a cell.


  1. Telophase
  • This is the final stage of the Mitosis process. In tis stage, spindle fibres disappear and a nuclear membrane forms around each separated set of chromosomes.
  • The cell is nearly done dividing and it starts going back to its normal structure as Cytokinesis.
  • In this step, two new nuclei are formed. the nuclei is obtained from the two different chromosomes. The nucleoli and nuclear membrane also reappear.
  • The chromosomes begin to decondense and return to their stringy form.


5. Cytokinesis

  • Cytokinesis is the process of the separation of the nuclei into two daughter cells. This process is different for plant and animal cells. in plant cells a cell plate forms between the daughter cells. In animal cells cytokinesis is contractile, pinching the cell in two.


Edible DNA

  • How does this model show:
  • This model contains marshmallows and licorice. The marshmallows represent the nitrogenous bases and the licorice represents the Sugar Phosphate backbone.
  • What is DNA?
  • Deoxyribonucleic acid is referred to by the acronym DNA. All organisms with a life contain DNA. Furthermore, all living creatures share the same DNA molecule structure! DNA resembles a double helix when it is stretched out after being removed from a cell. The backbone and rungs of the DNA ladder are referred to as bases, and their sides are known as the ladder’s sides.
  • In DNA, there are four chemical bases: (A) Adenine Guanine, Cytosine, and Thymine
  • SBK1013 INTRODUCTION TO BIOCHEMISTRY: DNA REPLICATION
  • What does DNA do?
  • One of the main things DNA does is carry out genetic information. It is like an instruction manual for how a living organism grows, reproduces and functions. Your DNA is passed on from your parents which is why some of your features are similar to your parents. This could be your hair colour, eyes, skin colour, etc. Another important job the DNA does is converting information into protein which helps make your body.Human genome: 1 million sequences will open the doors of genetics
  • How easily DNA can copy itself?
  • DNA is a molecule that can be replicated perfectly. Each cell contains DNA that can be used to create all the other cells. A single cell can convert into trillions of cells through this process. The replication uses DNA polymerases which are molecules whose job is to copy DNA. The process of replication takes several hours but in the end you are left with twice the amount of DNA you need. Every time the cell divides, it can takes this excess DNA and give it to the daughter cell and parental cell making them genetically identical.
  • Mr. Robinson also demonstrated this in class. When he broke apart the DNA strand (the licorice) the marshmallows toothpicks also separated. This resulted in 2 licorice strands and each one of them having a stick of marshmallow.
  • What further questions do you have after building this model?
  • What would happen if the DNA has a mutation?
  • Answer: If the DNA has a mutation it could go two ways. It could either be beneficial or harmful. If we look at it beneficially, mutations can lead to new variations of protein that can help organisms adapt to changes in the environment. They can increase an organisms chance to grow and reproduce. Examples of positive mutations are, antibiotic-resistant. This allows them to survive in presence of an antibiotic drug.
  • If we look at this negatively, harmful mutations can cause genetic disorders. Some disorders include Cancer. Cancer happens when cells start to grow out of control and start forming abnormal masses.
  • How and when was the DNA discovered?
  • DNA was discovered in 1869 by a Swiss researcher Friedrich Miescher whose original goal was to study the composition of White Blood cells. Instead, he isolated a new molecule he named “Nuclein” from a cell nucleus. This was just the beginning of the DNA and after Friedrich many researchers dove further into studying the DNA.
  • Overview image

Bibliography:

DNA Replication (genome.gov)

DNA Replication Process with Diagrams Class 12 – Prokaryotic & Eukaryotic DNA Replication (byjus.com)

4.10: Mutation Effects – Biology LibreTexts

History of DNA – What is DNA & How Was It Discovered? | LunaDNA

Connection Based Learning: Designing and Creating

 CoDesign

Our class had the wonderful opportunity meet Saul Mwame who is a beekeeper from Tanzania. Mr. Robinson introduced Saul to us through zoom for the first time and we researched about Saul to be able to ask questions about his business, when he might be visiting Canada and information about bees. Saul runs a business a Haven Bees and takes cares of bee. He has spoken at the UN and has accomplished so much at such a young age. We have been talking to Saul over the past few months and were lucky enough to have Saul come in person and talk to us. I was extremely excited when I heard the news and looked forward to talking to him. Mr. Robinson put us in groups to ask Saul different questions and the question that stood out me was, “How can we help your business?” Saul explained how he was having trouble advertising and could use more help in that.

I had the chance to have a one on one conversation with Saul as he was sitting beside me. He explained how he was struggling with advertising his products and company online. After listening to his issues, I asked Saul how I could help with his problem and he said do anything you can to make my products gain more recognition. I connected to this problem and knew at that moment that I had to help Saul. I’m always on social media and have had a couple ideas on what to do.

CoOperate – How could you take action on your idea?

The big question was, “How can we help Saul’s business through advertising” Mr. Robinson allowed us to choose groups for this assignment. Maia and me had the same ideas for this assignment which is why we decided to work together. We both came to the conclusion that using the MakerSpace would be the best option for this project as we both had never used it and wanted to try out something new. We did some research on the 3-D printers and what websites we would need to use to operate the printers and pin makers. Since all this is very new to Maia and me we required Ms. Leung and Ms. Henderson’s and the peer tutor (Narissa) to help us. They introduced to a a new website called Cricut which is basically a website which helped deign our pins. After learning all this, we had plans and goals set. We created a deadline for each of our steps. Our steps included, discussion, designing and creating. We were juggling around with two ideas, one was either creating a circuit or do something artistic like pins. Maia and me finally decided that the pins would be the best option as it seemed the most beneficial to help Saul. Thanks to Ms. Henderson, Ms. Leung and Narissa for being so patient and helpful!

Our plan:

Monday= start plan/ projects

Tuesday= start designing the basic idea.

Wednesday= talk with Ms. Henderson

Thursday= we will start using the machines

Our goal was to be organized and complete our work with excellence which is why we had a thorough plan set beforehand to get the work done efficiently.

CoCreate – What creative idea do you have to help address the needs you learned about in Tanzania?

By this point, we knew we definitely wanted to help advertise Saul’s company, “Haven Bees” During our brainstorming process we had multiple ideas on what to do. We talked about making hoodies, stickers, pins, etc. We had a lot of things in mind but decided to put all work into the pins. With the time we were given, making hoodies seemed unrealistic which is why we wanted to do the stickers and pins. We decided to focus on making the pins first and then move onto the stickers if we had extra time. We were only able to make about 4-5 pins as a lot of our time went into learning how to use Cricut and operate the pin makers.

Pins are small items that can easily catch customer’s eye, can be worn anywhere and are cheap. Selling pins and advertising his business seemed like the most efficient idea. Our initial ideas was using his company’s logo colours and making a little cartoon out of that. After a bit, we both decide that we were over complicating the idea and decided that using a simple bee would look more appealing as they are the OG honey producers and simple to create. We looked at multiple bee designs and if they would look good after we used Cricut to modify them. After some brainstorming and thinking we used this: PICTURE OF THE BEE PINS

To make all our ideas into reality we took action, created proper dimension to fit the bee design on the pin and took turns using the pin maker. Ms. Henderson taught us how to operate the pin maker and showed us how to make one pin. After that, Maia and me made a couple and gave 1 to Saul and the other to his boss Scott Gordon.


To make everything workout efficiently we had to required a few skills,

  1. Communication: As this was a group assignment, the communication between Maia and me had to be strong. We both listened to each others ideas and took the strong points from everything we discussed to make this project a success.
  2. Creativity: This project is all about helping Saul in creative ways. I didn’t hold back in this assignments and let my mind take over. This allowed me to express what designs I had in mind and apply them using different tools.
  3. Learning Mindset: A lot of things we learnt required having a mindset which encouraged leaning. All this was a new experience and a having a positive mindset is important for this assignment.

Materials:

  • MakerSpace
  • Cricut: Designing and getting the right dimension for the pins
  • Pins
  • Pin Maker
  • A thin sheet of plastic to put on the pin


Commemorate – How did the process go?

Overall, the process went smoothly. It was a great experience meeting Saul. What he is doing is awesome and his company definitely needs more recognition which is why we stepped in to help him out. Connecting with a person like Saul is truly amazing as he is such an inspiration. The process of creating the pins was a lengthy process of discussion, planning and designing. This project allowed us to explore the Makerspace and a new tool called the pin maker.

We chose to use pins as pins are such a versatile object. Almost every fundraiser, fair and promotions I see small pins being handed out. They are small but mighty an we hope to make these pins in bulk to hand out. We also wanted to keep the design nice and simple as overcomplicating it could make it not pop out.

Going into the Makerspace was fun and all the teachers were super welcoming. This made the process of making the pins so much easier as we didn’t hesitate to ask questions and all our questions were answered.

Everything was coming together and our first 3 pins came out the pin maker flawlessly. When we making our 4th pin a problem occurred. We put the pin in the pin maker but realized that the metal portion of the pin was missing making our pin come out in a weird shape and the plastic expanding way too much. Both of us were confused but we recovered by resetting the machine and starting all over again. That definitely alarmed us but we solved the problem with a quick fix. In the, all our be pins came out exactly the way we wanted them to.

For future assignments, I want to improve my time-management skills. We only had 4 days to design, plan, make and write out everything for the assignment. I felt rushed and sometimes started panicking because I was unsure about if we were going to finish in time. Time was ticking faster than ever and we finished our pins 5 mins before the deadline. We hustled but I’m very happy with our pins. We had very little time to do this blog post too. To finish this blog post in time I worked at my fastest pace.

I’m extremely grateful for the opportunity to meet Saul and Mr. Gordon and hope I can still keep helping them out in the future.


Currents from the kitchen Pre-Lab & Lab

Purpose: Which fruit/vegetable will produce the most electric voltage?

Hypothesis: When I attach a galvanized nail and copper strip to a potato, the greatest voltage will be produced.

Materials: Fruit/vegetable, Voltmeter, 2 wires, 2 different metals (copper/zinc), knife

Procedure: 

  1. Cut the piece of fruit/vegetable
  2. Put it in 2 pieces of metal
  3. Attach the voltmeter using wires
  4. Record the results
  5. Compare results from several pieces of fruit

Why? The potato will produce the greatest voltage because it has electrolytes on its surface. Electrolytes act as an electrical conductor and allow the flow of electric charges. When metals like zinc and copper are inserted into the potato it will produce the highest voltage.

Observations:

  • We played around with the each of the fruits and vegetables and tried out different set ups. First, we inserted the galvanized nail and copper strip completely into the fruit/vegetable. The voltage didn’t fluctuate of change. We did this the other way around and only stuck the nail and copper strip on the the skin of the fruit/vegetable. The voltage remained the same even though both metals weren’t inside the fruit.
  • We also tried different things with the voltage wire. When we attached the red wire to the nail the voltage went into the negative. When we attached the same wire to the copper strip, the voltage numbers were positive.
  • We also made the nail and copper strip touch each other in the experiment. This gave an interesting result as the voltage numbers kept changing as. We tried this out on the apple and the discovering that was pretty cool.
  • We also tried another experiment where we had to make a led light up using fruits, galvanized nail and copper strips. It took us a long time but we finally figured out that we had to make a circuit. The circuit had to be connected in a pattern in order for the led to light up.


Results:

  1. Lemon: 0.3 volts
  2. Pear: 0.5 volts
  3. Potato: 0.45 volts
  4. Apple: 0.4 volts
  5. Mandarin: 0.4 volts
  6. Pickle: 0.85 volts
  7. Cherry Tomato: 0.5 volts

What is causing electrons to flow in this experiment?

The electricity isn’t coming form the fruit/vegetable. Instead, it’s coming from a chemical reaction resulting from the differences in electro-negativity between zinc and copper. Like a waterfall, this cause the electrons to move from a high potential region to a low potential region. Since the nail is made of zinc which is more reactive than copper.

What are the independent, dependent and controlled variables of this experiment?

Independent: Fruits and vegetables

Dependent: Voltage

Controlled: Galvanized Nail and Copper Strip

How can we modify our experiment to improve our results?

    • Usage of fresh fruit and materials: A few of the fruits were a couple days old. To make the experiment as accurate as possible, having fresh fruits that are contaminated or rotten is important. The nail and copper should not be corroded. This could have been a source of uncertainty for the experiment.
    • Sizing: Having larger fruits, nails and copper strips can lead to more accuracy. This will increase chances of a reaction and more accurate results. A lot of fruits were small and breaking apart. For a few of them the nail and copper strip weren’t even able to stand up. This could have interfered with the results.
    • Repetition: In all our previous labs we made sure to perform the experiment atleast 2-3 times and taking the average of the results. We only did the experiment once on each fruit. Only doing it once doesn’t always give accurate results.

What could be sources of error or uncertainty in our experiment?

  • Contamination: The fruit could be improperly washed causing dirt particles to interfere in the experimentation process.
  • Temperature: The temperature of the fruit could be fluctuating throughout the experiment. Chemical reactions can be affected by this.
  • Human Error: Misreading the voltmeter or placing the galvanized nail and copper strip improperly could mess with the results. Sometimes I got confused while reading the voltmeter and my partners made sure to correct me to get accurate results.

How can I use this in my everyday life?

  • Mr. Robinson gave us a challenge to use fruits, galvanized nails and copper strips to make a mini bulb light up. It took us several tries but we figured out that it takes a full circuit for the bulb to light up. I found this very intriguing and realized I could apply what I learnt in this experiment to real life situation. For example, creating my own light only using a couple materials.
  • After some research I read that some of the materials we used can be used for many purposes. For example, a galvanized nail is coated with zinc to prevent rusting Not only that, copper strips are used for metal detection.
  • You can also check the acidity of a fruit using a galvanized nail and a copper strip.

Conclusion:

My hypothesis was incorrect. I predicted that the potato would have the highest voltage due to the electrolytes on its surface. I was proved wrong after doing the experiment and the pickle had the highest voltage. Just like potatoes, pickles are also great conductors of electricity due to their high salt content. After learning that, the results make a lot more sense. After the experiment I wonder what would have happened if I used a large pickle. When we used the pickle, there were already several holes in it and it was mushy. Even though it wasn’t in proper form it still had the highest voltage. I wonder what would have happened if I used a fresh pickle that was big and unused. How much would that increase the voltage by? Or would it remain the same?

Pictures from our lab:


Periodic Table Feedback Reflection


  1. What I know well about the periodic table?

After doing the Kahoot, I understood what information I know about the periodic table. I did well on the Kahoot and my concepts are pretty clear. I did well on questions related to the periodic table and our most recent lab which is “Meet The Elements” Questions like, “How is the periodic table arranged?” “What elements fall under the metalloid category?” is something I got right and I understand. I also know what metalloids are and where they are located on the periodic table. I was correctly able to identify that tin isn’t part of the metalloid section. Mr. Robinson talked about how the periodic table is arranged based on its atomic number and chemical properties which is why I will never forget the foundations of the periodic table. I was also able to demonstrate my learning when questions related to the elements were asked. For example, I was correctly able to answer that copper and gold aren’t silver-coloured metals. My understanding on what malleable, ductile, electrons, protons and neutrons is also good. Overall, I feel I have a strong understanding on majority of the topics and just need more practice to polish down my concepts.

Image result for metalloids

2. What I still need to work on regarding the periodic table?

This Kahoot helped me recognize what areas I need to study for on the periodic table. When questions related to the periodic table families were asked I got a few of them wrong. Anything related to the rows or columns confused me. For example, one of the questions asked, “Do families all have the same number of valence electrons?” I got the question wrong because I wasn’t sure if this statement was right or wrong. I also need to work on my understanding of Alkali metals, Halogens and Noble Gases. When a question related to the characteristics of Alkali Metal was asked, I was confused and didn’t know the right answer. Another concept I need to work on is how to identify ions. I got a question wrong when it asked if the Sulphide ion had more electrons than protons. I need to focus more on the characteristics of Alkali metals, the classification of the periodic table and identifying ions.

Image result for periodic table

3. What I wonder about the periodic table?

A few things I wonder about the periodic table are,

  • How is Mendeleev’s periodic table and the periodic table we use today different?
  • What process was done to determine the atomic weight of each element on the periodic table?
  • Why are there question marks on some of the elements on the periodic table?

Image result for mendeleev working on periodic table Image result for uus element

4. What goals I will set to understand the periodic table better?

To understand the periodic table better I just need to spend more time understanding and analyzing it. For our upcoming quiz, I plan on studying the different families in the periodic table and understanding their properties. I also want to focus more on building and understanding the different properties of an ion. I think the best strategy is memorizing all the important parts of a periodic table like the alkali metals and noble gases.

Halogens and Noble Gases Authors


HCE 9- English Assignment: The power of acceptance of inclusivity

The following is an exploration of Birds On A Wire through an expository paragraph on the learning concept of inclusivity, acceptance and welcoming everyone.

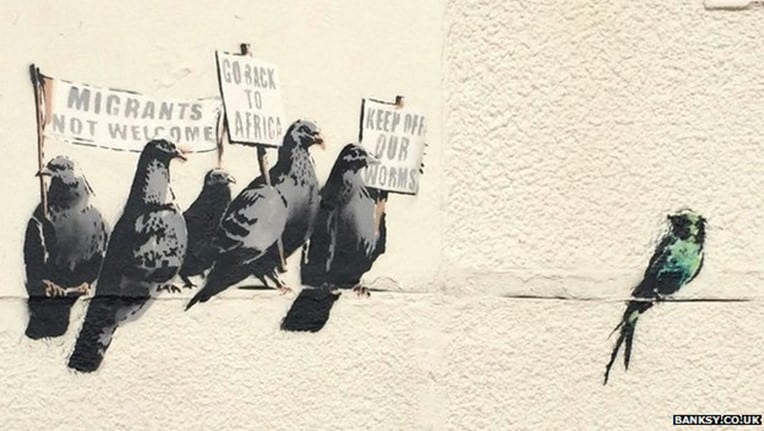
Immigration is by definition a gesture of faith in social mobility. It is the expression in action of a positive belief in the possibility of a better life. Saying goodbye to the past and opening doors to a new life. Birds on a wire is created by the world-renowned artist Banksy. This is one of his art pieces which has a lot of  meaning to unpack related to that subject. This picture communicates the reality of how immigrants struggle in a new country. The unique, colourful bird looks different from the big, grey-coloured birds. Judging from the signs the big birds are holding the colourful bird has arrived from Africa hoping for a new beginning but isn’t being treated respectfully. The sign the grey birds are holding has disrespectful and unwelcoming comments written on them. The body language of the colourful bird seems to be withdrawn and distant from the other birds. This represents the impact those inconsiderate comments have made on the unique bird. Not only that, the entire painting is dull and monochrome. The bird that has arrived from Africa is portrayed in vibrant colours showing how different it is and stands out from the crowd.  Diving deeper into the meaning of this painting, one of the signs reads “Keep of our worms” The artist has connected that statement wonderfully to how immigrants are viewed in the real world. The big birds don’t want to share their worms with an outsider. This applies to the real world because people don’t want to share their resources and jobs with someone that isn’t a citizen of that place. They think of immigrants as outsiders, when in reality they are just human beings like everyone around them. Each bird is holding a sign that portrays the different point of views and thoughts people have on a person that doesn’t share the same physical and ethnic attributes as them. Several people have their own stereotypical comments imprinted in their heads and are stuck in that mindset just like those birds. In the painting, it is evident that the grey birds are represented in a smooth, rectangular box. This signifies their mindset being stuck in a box of conformity. They are stuck in that box and their vision isn’t going beyond it. The box is acting as a restriction and blinding them from seeing the beauty outside of it. Often times, these actions are influenced by their surroundings. In the painting, one of the grey bird’s has its head turned around. Based on its body language, the bird seems uncomfortable and unwilling to hold the sign. It seems as if it is pressurized to be in the situation and didn’t have any other options. It could have had a different opinion on the situation but is pressured to follow the chain. Unfortunately, this is also perceptible in our society today. People let others control their actions as they feel the need to fit in. Instead of being unique individuals, they are cemented in conformity unable to get out. This world would turn into the big, grey birds’ society if there wasn’t diversity. There are millions of people in this world, different sizes, ethnicities and cultures, but in the end, we are all human. Perhaps, if the grey birds welcomed that unique bird with open arms, their community could start mending and building a community that supports inclusivity and acceptance.

1 2