January 2017 archive
In Chapter 6, I learned about Factoring polynomial expressions.
In lesson 1, we reviewed how to expand a fraction and what the Greatest Common Factor (GCF) is and how to find it using prime factorization. I learned to factor a polynomial by removing the greatest common factor.
In lesson 2, I learned that sometimes the GCF is a binomial instead of a monomial, this is called Binomial Common Factors. This is used when factoring by grouping, by removing the GCf from a pair of terms and then factoring by a binomial common factor. We also learned about Monomial Common Factors involving fractions and when to use them (in later lessons and math courses).
Lesson 3 started with algebraic tile diagrams and how to use them to write polynomial expressions, then factor trinomials. I also learned to factor trinomials without algebra tiles, and by inspection by expanding the equation and inspecting to solve. Furthermore, I learned that in some situations the expression cannot be factored.
In Lesson 4, I learned how to factor trinomials of the form X² +bx +c. In order to factor this, there needs to be two integers whose product is equal to C and whose sum is equal to B. If this isn’t possible, then I know that the expression cannot be factored. If the product is positive, then the two integers have the same sign (both positive, or both negative). If the product is negative, then one of the integers is positive.
 Lesson 5 introduced Difference of Squares. (Shown in image) This is a method to factor an expression described as: a² – b² = (a-b)(a+b).
In Lesson 6 I learned a method for factoring polynomials that took the form of ax² + bx + c, this method is called decomposition. “The method of factoring ax² + bx + c, by splitting the value of b into two integers whose product is ac and whose sum is b.” Is how the textbook described the decomposition method. This method can also be used to factor trinomials with the form ax² + bxy + cy².
In lesson 7 we reviewed what perfect squares were and how we use them in factoring. When a trinomial is a perfect square, the middle term has to be twice the product of the square roots of the first and last term. Using this rule, we identified which polynomials were considered perfect squares and factored. We also expanded on the previous methods of factoring.
Lesson 8 was just a review and guidelines of factoring.
The following breakdown/reivew was included in the textbook.
- Look for a common factor. If there is one, take out the common factor and look for further factoring.
- If there is a binomial expression, look for a difference of squares.
- If there is a trinomial expression of the form x² + bx + c, look for factoring by inspection.
- If there is a trinomial expression of the form ax² + bx + c, look for factoring using decomposition. Watch out for perfect square trinomials.
- If there is a polynomial with four terms, look for factoring by grouping.
- After factoring, check to see if further factoring is possible.
Lesson 9 was an enrichment lesson on solving polynomial equations in which the left side is a polynomial expression and the right side is equal to zero.
In Chapter 5, I learned about Polynomial Operations
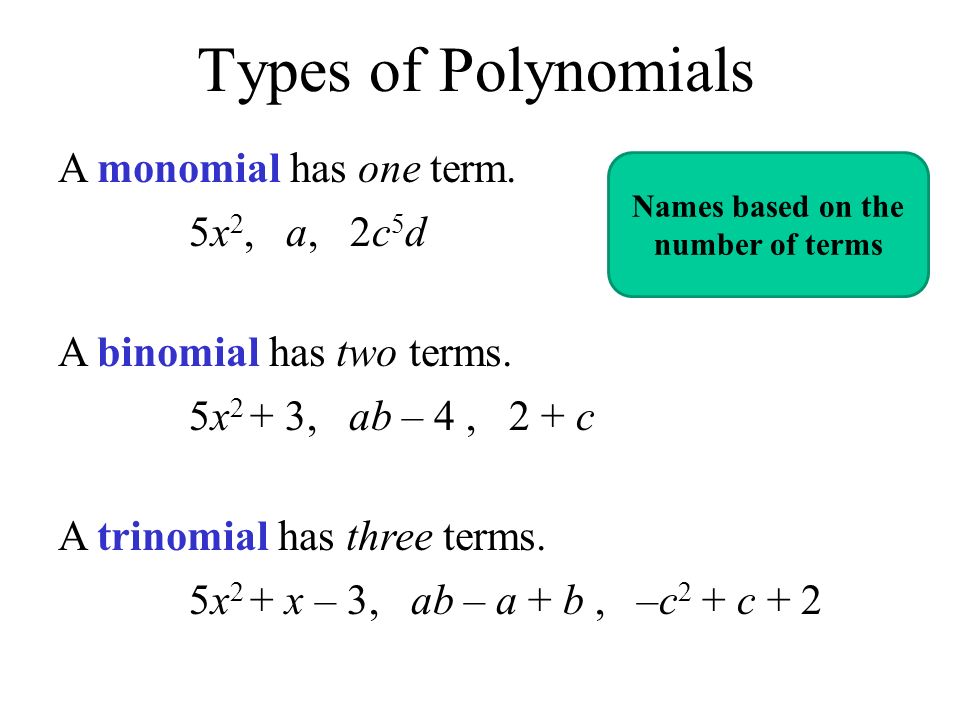 Lesson 1 was review and a preview into the chapter. We reviewed what a variable and what an algebraic expression is. We also learned the difference between a monomial, binomial, trinomial, and a polynomial. (shown in image). With these polynomials, you can classify them by degree. “The degree of a monomial is the sum of the exponents of its variable(s)” and “the degree of a polynomial is the degree of the term with the highest degree.” After we learned how degrees work, we started to add and subtract polynomials. At first, with algebra tiles, then, just algebraically.
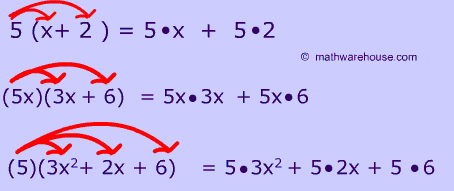
Lesson 2 taught us how to multiply a polynomial by a monomial. Again, we used algebra tiles at first but then we learned how to expand an expression using the distributive property. The distributive property is a(b+c) = ab +ac. (examples shown in image below).
 In lesson 3, We expanded on what we knew and learned how to multiply two binomials together. In this lesson, there were two models, algebra tiles and an area diagram, however I prefer to solve algebraically. Again, we expanded on the distributive property concept. The distributive property for two binomials is as follows: (a+b)(c+d) = a (c+d) b (c+d)= ac +ad +bc +bd.
I learned to use the acronym FOIL to help remember which terms to multiply first
F- First term in each bracket
O- Outside terms
I- Inside terms
L- Last terms in each bracket
In lesson 4, we practised the FOIL method and multiplied polynomials together. This continued in Lesson 5, and we were introduced problem solving by multiplication of polynomials and went more in depth with this in lesson 6.
In Chapter 4 I learned about Trigonometry.
In lesson 1, I learned about the Trigonometric Ratios. The three ratios are Sine (opposite over hypotenuse), Cosine (adjacent over hypotenuse), and Tangent (opposite over adjacent). I also learned about SOH COH TOA, and what it means. SOH represents the sine ratio, COH represents the cosine ratio, and TOA represents the tangent ratio.
In lesson 2, I learned how to use a calculator to solve trig ratios. When given the ratio, I need to find the angle and vice versa, to do this we use the inverse operations of said ratio.
In lesson 3, I learned how to calculate the length of a side in a right triangle and how to cross multiply to solve.
In lesson 4, I learned how to calculate the measure of an  angle in a right triangle. In order to do this, you need to know at least two side lengths of the triangle. And then you use a trig ratio (SOH CAH TOA) and plug in the numbers to solve. I also learned about the angle of elevation and the angle of depression. (Image shown). The angle of elevation is measured upwards from the horizontal line, while the angle of depression is measured downwards from the horizontal line. I learned how to apply this knowledge to solve word problems.
In lesson 5, we reviewed and practised solving right triangles. Depending on the information that was given for each example, we used the Pythagorean Theorem, Trig, or both.
In lesson 6, problem solving was introduced and I learned how to solve them using the trigonometric ratios. I also learned about Bearings which are angles measured clockwise from the north direction and they were also included in the word problems.
And lastly, lesson 7 was more practice and problem solving using trig ratios. These questions were little more complicated and we started solving problems with three dimensional shapes.
In Chapter 3, I was the measurement unit. Here is what I learned from each lesson:
Lesson 1- Review on how to round numbers and how to substitute formulas.
Lesson 2- Different referents in measurement. A referent is a term to describe objects that were used to measure before real measuring tools were invented. Examples include: thumb, hand, pace, cubit, and pace. I also learned the difference between the Imperial System and the SI (metric system) of measuring.
Lesson 3- Different devices to use for measuring and how to use them. A vernier calliper is a measuring tool that is generally used for finding measurements of fine and tiny things. A vernier calliper measures to about 0.1 mm to 0.05 mm. A micrometer is a measuring tool that is generally used to find the thickness or the outside dimensions of smaller objects. A micrometer is more precise because it measures to the nearest 0.01 mm. I also learned how to read these two devices. 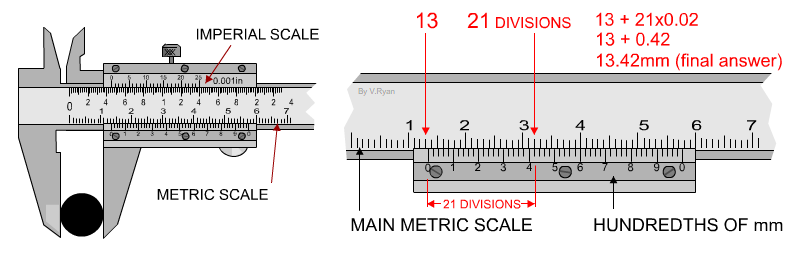
Lesson 4- Conversion between the metric system. I learned about different methods to convert within the SI system, such as using the metric unit number line, using proportional reasoning, and using unit analysis.
Lesson 5- Expanding on lesson 4, I learned how to convert measurements within the imperial system and between the SI system and the imperial system. We can still use the previous three methods (metric unit number line, proportional reasoning, and unit analysis) for converting measurements in the SI system and for conversion between the two systems.
Lesson 6, 7, 8, and 9 were all about surface area and volume. In lesson 6 I learned how to apply conversions into square units of area. We expanded on this idea when we learned how to calculate the surface area and volume of prisms and cylinders (lesson 7), pyraminds and cones (lesson 8) and of volumes and spheres (lesson 9).
In Chapter 2, I learned all about exponents 🙂 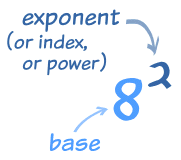
In the first lesson I learned all about powers with whole number exponents, and what the base, exponent and index is.
In lesson two, I learned about the exponent laws. When multiplying exponents (with same base), add the exponents together. When there is a power raised to a power, multiply the exponents. And when dividing powers, subtract the exponents.
Lesson three, I learned about Integral exponents. When a base is raised to a negative exponent, you transfer the negative exponents into a fraction with a positive exponent.
The next lesson we did was lesson five, which taught us about rational exponents. We learned about fractions in radical form and methods on how to evaluate and simplify them. We continued this learning into lesson six, where we took bases raised to fraction exponents and wrote them in radical form, and simplified.