Top 5 things I learnt in Pre-Calc 11
Surprisingly, pre-calc 11 has went by pretty fast. Today, we just finished off our last unit test and are now going to take the upcoming week to study for our final. That being said, I have reflected on this semester and have compiled a list of what I think are the 5 most important things I learnt this semester, in order 1-5.
#1: The factoring box.
For most people in the class, they probably have known how to do this since grade 10. But however, for some reason this concept never clicked for me. Meaning factoring always ended up taking me longer than most and required me to think extra hard trying to find other ways to do it. This year, in grade 11, this concept was re explained to me in class and it started making a lot of sense. The “box method” saves me a lot of time on tests and while just completing daily homework and I find it doesn’t take much thinking and now that i’ve gotten comfortable with the concept I find myself not even really thinking necessarily and just doing. Without learning the box method in the first unit, basically all the units following until trigonometry would have been very difficult as it required a lot of factoring.

#2: Rotational angles
This was a new concept for us this year, as last year in trigonometry we just did angles in quadrant one. But this year as we started using all four quadrants we introduced this new concept and term “rotational angle”. Basically it is the angle that is symmetrical to the angle in quadrant one and will have the same reference angle, but we are measuring the angle it rotated from position one in quadrant 1 to quadrant 2,3,4. Depending on what quadrant it is in you would calculate it differently. For example in quadrant 2 you would do 180-refrence angle. I think that was important to learn because as we keep going in math (pre-calc 12), this will keep coming up but get harder so I think it was good that we started it this year and i ended up grasping the concept, although not right at first.

#3: Rational expressions
I found this unit to end up being my favourite unit we did. For me it was not overly challenging but I liked the attention to detail you had to have because, like most things in math one little mistake and the whole question would be done but I found especially in this unit. I chose it as one of my top 5 because it aloud me to continue to better my factoring skills and become much faster at them then I had been before, which will be beneficial for me as I continue on in math. I also just found it made a lot of sense for me, sometimes in math we do steps in a question where I don’t see why but everything in this unit just made sense.

#4: Rational expressions; inequalities
Unlike #3, this was not a concept that came easily to me, or even made sense at all. And that is why I added it in. These types of inequalities really challenged me. It required to stay in for a couple lunches and spend lots of time after school studying and trying to figure them out and master them. I am not sure if these will show up again in math, but that isn’t why I added it in my top 5. I added it in because they showed me things don’t always come easy but you can’t just give up. There was so many times I just wanted to stop and hope I figure it out on the test or go and eat lunch with my friends, but that would have been giving up and it showed me that with hard work and determination I can do it. And I hope to carry that attitude and drive with me throughout the end of high school and to post secondary.

#5: Graphing and finding the stretch.
This is a concept that took me a while to first figure out and as we go back to study for our final this concept just isn’t fully coming back to me. But I find this quite interesting how each number just has a spot in the equation. I know that with some more review it will come back to me. I found that just going back and reading my blog post on this topic already has started to help, because it is me explaining to me. Why I added it in was because I remember very clearly this was the last thing I needed to learn before the unit test and for some reason it wasn’t clicking, but I couldn’t just let it go as it was a very important part of the material I needed to know. So I took the time the specifically focus on this and getting a classmate to explain it to me as well as Ms. Burton and then I took that home and practiced for an hour or two and ended up getting it, even though it felt so impossible.
And those are my top 5 things I learnt this year in Pre-Calc 11, some for math reasons and some for more personal growth reasons. I really enjoyed this course and am excited to continue taking Pre-Calc 12!
Pre-Calc 11- Week 16
This week in pre calc we started learning sine/cosine law. Learning these laws made trigonometry much easier and faster to do. The laws consist of different formulas made up to find either a missing side length or a missing angle in a triangle.
Sine law: For sine law to work you need to have an angle and the side length facing each other at least once, because without this you won’t have enough information to fill into the formula and will have too many unknowns, making it impossible. Another thing to be aware of is you need to check for the second triangle in quadrant II. How you do this is you take what the angle would be in quadrant II (180-__), and then add it up with your other angles. If it goes over 180 degrees you will reject the answer because we know that doesn’t make sense and can’t be possible.
Formula:

You don’t need to use all three options when solving for either the side length or the angle though, you need one fraction fully filled out as well as your fraction with your unknown.
Applied:

Cosine Law: Cosine law is a mesh of trig as well as the pythagorean theorem and you will see that when you look at it. Something to remember when using cosine law is when you’re solving for a side length, at the end, you need to square root your answer as well as b^2. Just like in pythagorean theorem your second last line of work needs to be square rooted because you can’t have what you’re solving for squared. When you’re solving for an angle using cosine law it is the equation to solve for a side length but rearranged algebraically. Something to note when solving for an angle is, when putting it into your calculator you need to put brackets on the top line of work as well as around the second line, just so your calculator doesn’t get confused and accidentally give you the wrong answer or an error.
Formula:

Applied:

These two new laws that we have learnt, in my opinion has made trig this year much easier and make much more sense for me. It’s just a matter of labeling everything properly, which if you weren’t sure how, you label the side length across from the angle the same thing. So if angle A was facing a side length it would now become side a. It’s more a thing of punching it into your calculator properly.
Week 15- Pre Calc 11
This week in pre calc 11 we reviewed trigonometry and started on our new parts of it. This week we focused on finding angles in ALL quadrants and not just one quadrant, meaning we have more than just one answer, where as before when we would only find the angle in the one quadrant we would just have one angle.
We also learnt a new acronym that will help us know if the ratio is going to be positive or negative in what quadrant. The acronym is “All Students Take Calculus”. This makes solving questions a little faster, because now when solving for theta we have more than just one answer, so it is useful to know if it is going to be positive or negative and will save you some time.

Here is the acronym “All Students Take Calculus” in the quadrants. What it is showing you is that in quadrant one all ratios are going to be positive. So no matter what ratio or numbers you use the answer will always be positive. In quadrant two all sine ratios will be positive but everything else will be negative. In quadrant three all tan ratios will be positive while the rest are negative. And in quadrant four all cosine ratios will be positive. This acronym is good to know because if you for example find an angle in quadrant three that’s tangent and it’s negative well then you know you did something wrong and can go review what you did.
Those were the big things we learnt this week. Some simple things but will make trigonometry much easier if you know how to do them.
Blog post – Week 14
In this blog post I am going to focus on word problems- specifically a dilution question. Dilution meaning ” how many mL/L of water should be added to ___”. For these types of questions all you have to do is set the equation up properly and then solve. So the most important thing is to make sure you’re very careful when you’re reading the question.
Word problem: “How much bleach should be added to 50L of water to make the solution 8% bleach?”.
Step 1: The first thing we need to do is a let statement… this is so whoever is correcting your work will know what x is representing, because without a let statement you would more just have to guess. In this equation x is going to equal the amount of bleach added because everything else we already have numbers to insert into our equation but x is missing, it is what we are looking for.

Step 2: Now you need to set up your equation. So we know that 8/100 is what we are starting with. So that goes first. And that is equal to x/x+50 because x is our new amount of bleach, and our new amount of bleach+50 is our new concentration.
8/100=x/x+50
Step 3: Now we just cross multiply and solve for X.
8x+400 = 100x
400 = 92x
400/92 = 92x/92
x=4.3 L of bleach
Step 4: Always finish off with a sentence answer. ” 4.3L of bleach needs to be added to 50L of water to make 8% bleach solution. ”
And that is all. Make sure you always take your time and understand what the question is asking you.
Pre-Calc 11- Week 13
This week we worked on adding/subtracting rational expressions. Just like adding or subtracting regular fractions, we need to have a common denominator meaning whatever we multiply the denominator by we need to multiply the numerator by, and then after that simplifying the equation and doing whatever factoring is needed.
Example:

Step 1: The first step is to make sure everything is factored. In this example everything was already factored so that step is done. Next state the restrictions. I find it much easier to do it at the start so I don’t forget when I have completed the question. The restrictions is anything that would make the denominator =0.

Step 2: Now we are going to look at the denominator and see what is missing from either side. I can see they both have a (d-2), so I don’t need to do anything with that. But the right side is missing a (d-4) as the left side is missing (d+1). So what I need to do is multiply either numerator with the missing denominator.

Step 3: Next, I FOIL the top, making sure I don’t make any mistakes as that would really mess up the rest of the question. I usually do this step twice to make sure everything was done correctly, as it’s very easy to make mistakes on.

Step 4: Now simplify the numerator. Collect all the like terms.

Step 5: Now look at the numerator and see if it can be factored. In this case it can be and I used the box method.

Step 6: Now you put the factored form in the numerator and your question is done.

And that is all you do. Always remember to state your restrictions!
Blog Post- Week 12
This week in Pre-Calc we started our rational expressions unit. Which involves a lot of factoring and “canceling out” like terms to get your expression down to its simplest form possible. One thing to remember is that something like “x+5” is like one number, so if we had x above that, the two x’s could not cancel out.
 Example question
Step 1: The first thing I am going to do is simplify the denominator. You don’t need to do it in any particular order but I find it easiest to do it this way. I notice that 81 is a perfect square same with x^2 and it’s a subtraction, so I know this is a difference of squares. Meaning that I take the square root of 81 (9), and do (x+9)(x-9), and when foiled back out will equal to x^2-81.

Step 2: Now I am going to deal with the denominator. When I look at the pattern of the equation I am going to see this is a product and sum question. What multiplies to -18 and adds to 7? -2,9. If you check -2×9=-18 and 9+-2=7, so this is going to work. Now because there is no number in front of x^2 I can just put them in the brackets.
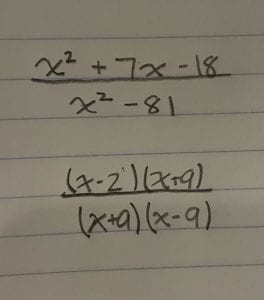
Step 3: Now I am going to cancel out like terms and “clean up” my rational expression. I can see (x+9) on the top and bottom, meaning they cancel out to an invisible 1.

Step 4: Now the last thing I need to add into my answer is the non-permissible values. Meaning numbers that if put in the place of x in the denominator would equal to 0, which we can’t have. Go through your entire equal and do the non permissible values for the whole entire equal, every line of work. Sometimes the numbers can change or cancel out. So here, I can see the x cannot equal +9, and if I go up to my second line of work I can see if I insert -9 into the equal it would equal 0. so that will be my second non-permissible value.
And that is it for simplifying down rational expressions! Something to note** (x-1)(1-x) aren’t the same!!
Pre-Calc- Week 11
This week in Pre-Calc 11, we continued on with our quadratic equations. We started inequality’s and how to solve them. We still use the factoring- 1-2-3 method, which is: one thing in common, difference of squares and then the longer way of doing the box or decomposition.
An inequality is a symbol that shows if the expression is greater then, greater than or equal to, less than and less than or equal to zero.
When doing an inequality you’re trying to show where the parabola is either greater than 0, or less then depending on what the inequality sign is. The x axes is split into three parts by the parabola. It is good to draw out something like this when you’re doing the inequality so you can see where it is above or below zero.

Now I am going to show you have to solve an inequality.
Step 1: When you first get your equation, get your zero pairs. Just like you would do to find the x-intercepts.

Step 2: Draw a X axes and put your numbers down. Next draw a parabola so you can see what is going to happen. In our example you can see it is asking where is it less that or equal to zero. So I know by just my drawing it is going to be in section three.

Step 3: Next write out your equation without putting int he symbols yet. You know that x is somewhere in between -7 and 2, that is why you write it out like that.

Step 4: Now we have to put in our symbol. And how you do that is you know for x to be in the middle section it must be greater than or equal to -7, because if it was less than it would be in section1, but it has to stay in section 2. And x must be less than or equal to 2. And same thing, if it was bigger than 2 it wouldn’t be in the middle section anymore.
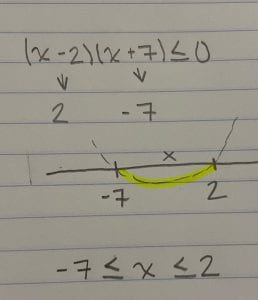
And I just wanted to show what it would be if the question was (x-2)(x+7)>0. This would be different because this is where the parabola is above zero. So section 1 and 3. And for it to stay in section 1 x has to be less than -7, and for 2 to stay in section 3, x has to be greater than 2.
In my opinion, drawing out the picture really helps. Without it I can’t really visualize what is happening but once you draw it out it becomes very clear, what is happening.
Pre Calc 11- Week 10
This week in Pre-Calc we finished up our quadratic functions unit. In this blog post I am going to show how you can look at a graph and figure out the equation. For this blog post I am going to focus on how to put it into the vertex form of the equation.
For this blog post I am going to use this graph as example:

Step 1: So to start off with I am going to look at the vertex. I know that my x value of the coordinate (5) is going to be inserted into the equation, In the position (x-5). But we need to flip the sign to negative. If we started with a negative it would flip to positive.

Step 2: Now I can take my 2, from the y part of the coordinate and add +2 after my bracket, to show it is going to have a vertical translation of +2 when you graph it.

Step 3: We have inserted all of the information we can from our vertex, we are going to need to use the given point to find our stretch. To do this we have to insert the x and the y values from our coordinate into the equation where there is an x or a y. So in this case our coordinate is (3,-2). so the -2 is going to replace y=, and the 3 is going to replace the x in the bracket. But if you go back and look at the original graph, it was congruent to the parent function, meaning there isn’t a stretch.
Step 4: The final thing we have to do is notice the parabola is a maximum so there has to be a negative out front of the bracket.
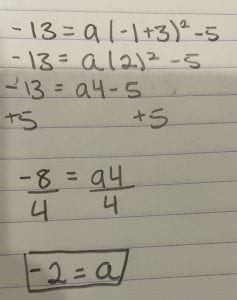
I’ll do an example on how to find the stretch. Let’s say we found the first part of our equation and the points given to us are, (-1,-13).
Step 1: The first step is to insert our x and y values, like I explained above. Put the -1 in where the x is, and -13 where y is. I am going to put a in front of our bracket to represent the stretch.

Step 2: Now we have to solve this equation. I am going to start with inside the bracket and clean that up.

Step 3: Now I am going to square the 2. And add 5 to both sides to get rid of the -5, as it can’t be added to the 4a.
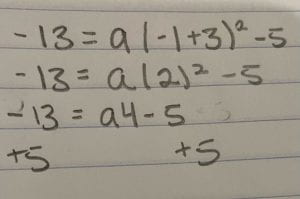
Step 4: My final step is to divide -8, by 4 because I have isolated the variable. When I do this I can see my parabola has a stretch of -2.
And that is what you need to know on how to look at a graph and put it into vertex form.
Pre-Calc- Week 9
This week in Pre-Calc 11, we continued with our analyzing quadratic equations unit. We learnt how to take each equation and write it in standard form, because the way they gave us the equation isn’t helpful to graph it but putting it into standard form makes it possible to graph it.
Example:

Step 1: The first thing we have to do, is make the x by itself, for it to be possible to complete the square. How we are going to do that is take the greatest common factor out of the first two numbers, a way to remember which numbers you take it out of, is if it has a x. In this case I am going to pull out a 2 and that leaves me with x^2 and 4x inside my bracket and we can see the -4 wasn’t effected and stays outside of the bracket.

Step 2: The second step is to find our zero pair we need to add into our equation. How you do that is take the number in front of x, divide it by 2 and then square whatever number you get. That can seem like a lot of work but in this case, you have 4. Divide that by 2 and you get 2, 2 squared is 4. And then you have to add in a zero pair, meaning you need to add +4, -4 into the brackets.

Step 3: Now I need to get my -4 out of the bracket. But to do that I need to multiply it with the 2 out front of my bracket. And the combine my -4 with the -8 I will get when 2 multiplies with the -4 from inside of the bracket.

Step 4: Our final step is to fix our bracket. You’re going to go back to the number you got when you divided it by 2 and put that into your bracket. In this case when I divided 4 by 2 I got 2, so that is the number I am putting back into my bracket and everything in this bracket is positive therefor it’s going to be +2, but if the number was negative you would put -2. It depends what is in the brackets you’re starting with.

Once you get your equation into this form it is ready to graph. In my opinion the most important step is when you’re adding in your zero pair and that is where I would go back and double check you did it correct because if not it will mess up your whole equation. But that is it! All you need to do now is identify the clues I talked about in my last blog post and graph this.