Math 10 – Week 8
This week in Math 10 we focussed on slopes. I personally have never done or seen slopes before but after doing them this week I see how simple they are once you know what you are doing.
In this blog post I will focus on on how to find the slope of a line.
There are two different ways to find the slope depending if you have the line in front of you or if you are given coordinates. Those are the two formulas, in which you should know to get the slope.

Let’s take this example for when you are given the line. My first step is to determine the rise and run. To do this I am going to count up first, and then to the side. If you count down then your rise is negative and if you count to the left for your run then the run is negative.

After you find the rise/run you simply just divide the two numbers. If they don’t divide leave it in a fraction and simplify it as far as you can.

Now if you are given the coordinates you are going to follow the formula given above. A common mistake is people mix up the X and the Y, but remember to put the Y on the top of the fraction line.

Once I get to this point in my equation I can subtract 3 and 7, 8 and 3. Once I do that I will divide or simplify my fraction and I have my slope.

Now that we did the basics we will do a harder question.

As you can see in this I followed the exact same steps as I did before. I subtracted Y2 from Y1 and then X2-X1. Finally divided but in this case left it in a fraction.
Just like that you know how to find a slope. It really is very simple you just need to know the formulas and plug in the correct numbers!
Math Blog Post- Week 7
This week in Math 10 we did our Functions & Relations unit. In this unit we quickly covered a few different topics but in this blog post I will focus on functions. I will explain what a function is and how to identify one in any type of graph or table.
What is a function? A function is when none of the input numbers are the same unless they share the same output number. So what’s the difference between a function and a relation? A relation is the relationship between the input and output numbers and a function is just one output for each input. A relation is a vast term, while a function is more specific.

In this example with the coordinates, I can identify that the relationship between these numbers is a function. There is no one way to identify if it is a function. You just need to go through all the input numbers and make sure they all have their own unique output.

In this example using a table of values I can see this is a function because same thing with the coordinates, all in the input numbers have their own individual output numbers. I find a table of values makes it easier to identify because they go down in a row.

In this table of values I can see that one is an input twice. Because they share the same output this is a function. If the 5 were any other number except for 5 this would just be a relation.

If you are given a graph like this the first step is to write down all the coordinates and then identify if it is a function or not.

Now that I have written out all the coordinates I can see this graph represents a function.
Functions are very easy to identify once you understand what one is. Something that confused me when first learning about function was that if an input number is put in twice it is still a function as long as the output is the same. To easily identify is it as a function write it out in way that works best for you. If it is given to you in the form of coordinates write it out as a table of values if that would help you!
Math 10 – week 6
This week in Math 10 we finished up our polynomials and factoring unit. In this blog post I am going to explain the third part of factoring 1-2-3, factoring trinomials! I will explain how to do it and then show an example.
There are different ways to approach factoring trinomials but I am going to show the method that works best for me and what I like to do.
Step 1: The first thing I do when I get my question, is write P and S that stand for product and sum. Because I know whatever multiples to equal my product must add to equal my sum. So writing it out can help you see the problem and get the result quicker I find.

Step 2: The next thing I do is figure the two number that are going to work. It can help to write out a list of what multiplies to give you a product of 10. I can easily identify that 5 and 2 will give me a product fo 10 and sum of 7. But my problem here is that my sum is a negative number. So here I am going to use the multiplication laws that tell me if I have two negatives when multiplied together they must give me a positive answer. And by doing this I will end up with an answer of +10 and -7.

Step 3: When factoring a trinomial the answer is always going to be in two brackets. Because I see I have a squared, I am going to put a in both and the brackets. And my last step is very easy, you put -5 in one bracket and -2 in the other.

Step 4: You don’t have to do this step but you can always take your factored question and solve it to make sure you factored correctly.

Those are the simple steps to factoring a trinomial. I am going to solve another one following the same steps I showed above.

Those are the simple steps to solving a trinomial. I find with practice you don’t even need to write out the product and sum but at the start it really helped me.
Week 5 – Blog post
This week in Math 10 we started our polynomials unit. In this blog post I am going to explain how to use algebra tiles. Algebra tiles can help you because it can be more visual to see the blocks instead of doing more of it in your head and leaves less room for mistakes.
First you need to know what the different algebra tiles mean. If an algebra tile is coloured in that means it’s a positive tile, that represents a positive number or variable. If the algebra tile is not coloured in it’s a negative algebra tile, which is representing a negative number/variable.

- A square tile represents a x2.
- A rectangle tile represents a x.
- A small square represents a constant.

Now that we worked through some basics we can get on to a question. In these types of questions you will see an expression given to you and you need to expand it out to algebra tiles.

Our first step here is to draw the equation dawn on the sides of the square.

Our next step is to draw in the algebra tiles on the inside. A trick I use is you draw the vertical line of the algebra tile the length of the tile on the left and the horizontal line the same length as the tile on the top
.
Now that we have all of our blocks drawn in the only step left is to draw in the positive squares and then cross out any zero pairs you may have. All you need to do is look at what is multiplying what. Remember when two negatives multiply the product is positive and when a negative and a positive multiply the product is negative!
And it’s that simple! Algebra tiles can be useful if you are a more visual person and need to draw something out. Just remember to always finish it by seeing what is positive and what is negative!
Math week 4
This week in math we finished up our trigonometry unit and started up our polynomial unit. In this weeks blog post I am going to focus on how to solve word questions in trigonometry. Word questions aren’t always easy but you have to look for clues throughout the question to make it easier. In this post I will show you what clues you should be looking for and then I will solve step by step a word question.
Clue 1: Ladder, string, guy wire is always going to be the side on a triangle that’s the angled side.
Clue 2: Tree, building, pole is always going to be the vertical side of the triangle and if you think about it, it makes sense because all those things are vertical objects that stands straight up and down.
Clue 3: Shadow, ground is always going to be the horizontal line of the triangle.
Clue 4: The angle of elevation is the angle from the horizontal line upwards and the angle it creates is the angle of elevation.
Clue 5: The angle of depression is the angle from the top of the triangle but it is on the outside of the triangle.

Word question:

Step 1: First we need to take the clues the question gives us and draw a diagram. I first notice in the question, they say that the building stands 1063ft high, which I know is referring to the vertical line. I then see they give us the angle of elevation which is 34.1 degrees. Then they ask us to find the length of the shadow, which I know is going to be the horizontal line.
After analyzing this information I can now make a diagram of the information they gave me.

Step 2: Now that have a diagram drown I can solve this just like any other question.

The most important thing while solving word questions is drawing the right diagram. I recommend that you have the diagram drawn above, at the top of the blog to help identify the clues the questions are giving you. And once you draw your diagram it is very easy, you just solve it like any other question!
Math week 3 – Blog post
This week in Math 10 we started our Trigonometry unit. In this blog post I will be showing how you find the angle of a triangle using trigonometry. To find the angle it only takes a few simple steps, but you need to be sure that you show your work and how you found your answer.
In my example I will be using this right triangle.

Step 1: First you need to label the sides of the triangle using the terms opposite, adjacent and hypotenuse. I recommend that you find the hypotenuse first by looking for the longest side of the triangle and note it is always across from the 90-degree angle. Next, I find the adjacent because I know it’s the side in between the angle you are looking for and the 90-degree angle. And finally, you have the opposite which is always across from the angle you are looking for.

Step 2: Next you need to identify if you are going to be using cosine, tangent, or sine. To easily find which one you are going to use the acronym “SOHCAHTOA”. In this case I can easily identify that I have to use my hypotenuse and my opposite side in this equation. So, I can go back and look at my acronym and see that “SOH” matches up with my sides because the “O” in it stands for “opposite” and the “H” stand for “hypotenuse.

Step 3: Now you are going to start your equation. You are going to start with “sin x” equals opposite divided by hypotenuse and how you know that is going back to “SOH” you can see “O” comes before “H” that is how you know which one is on top and what is on the bottom.

Step 4: Because you are finding the angle you are going to use inverse sine, which means when you write it out you put -1 above sin. In this step you are showing that inverse sin is being multiplies by 24/40.
Step 5: Now you are ready to put this equation in your calculator. You will put it in your calculator the same way it is on the paper. Because it is inverse sine you need to push shift and then put in your equation. (It is different on all calculators so identify what you need to do on yours)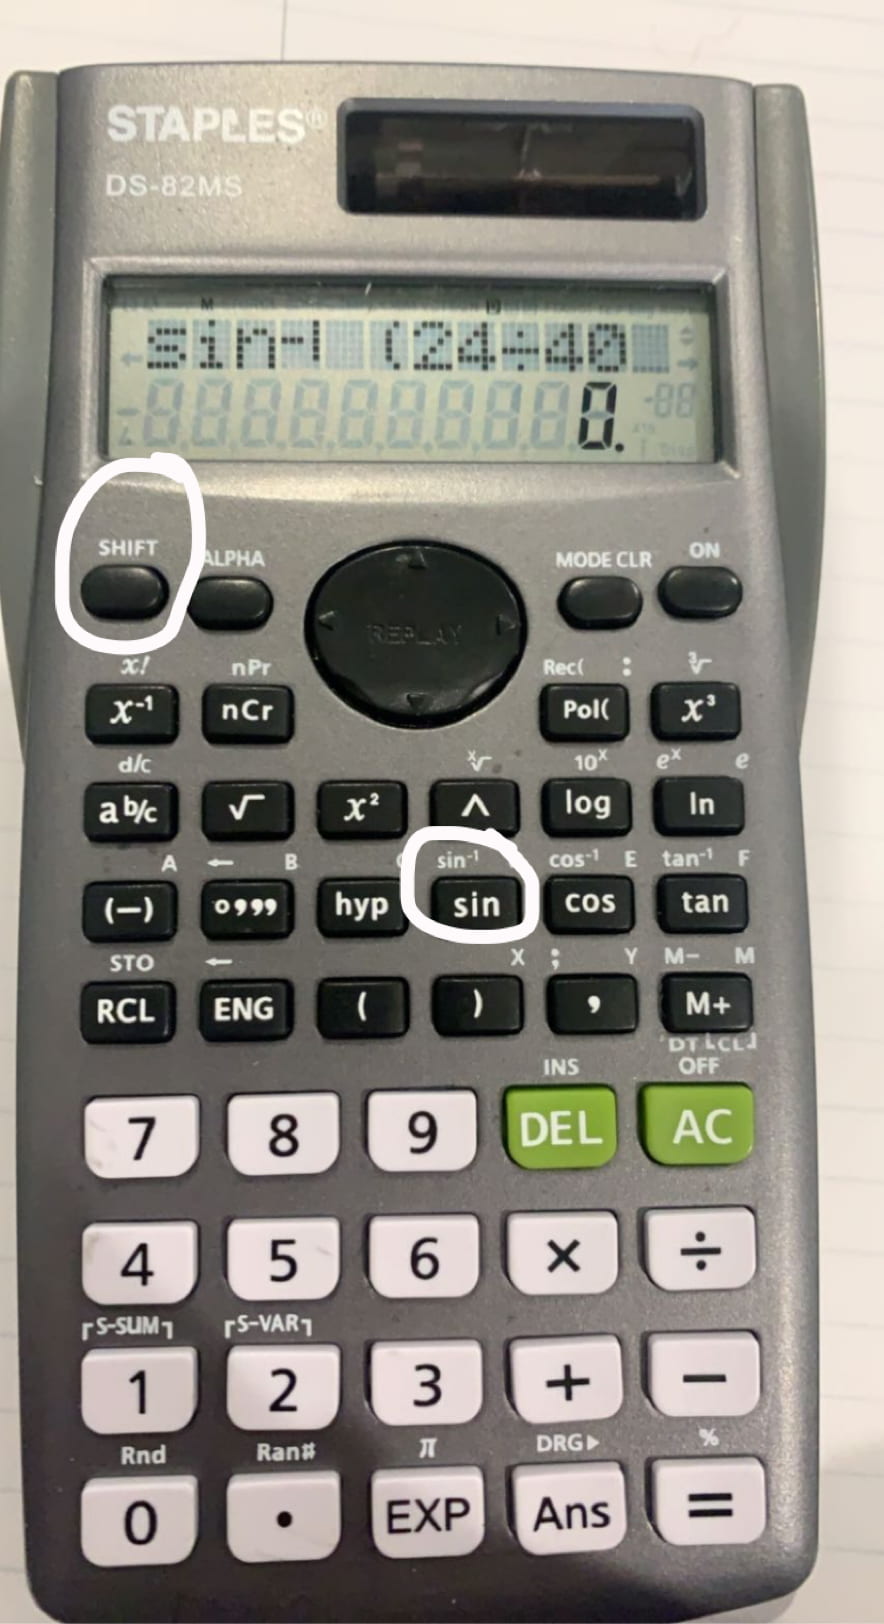
Step 6: When you press equal on your calculator it is going to give you a number with a lot of decimals. Because you are finding an angle it is going to ask you to find the nearest degree. How you do that is look at the first number after the decimal, if it is 5 or bigger round up and if it is 4 or smaller round down.

(This photo wouldn’t go the right way but the decimal was 36.86989765)
Step 7: So because the decimal is 36.8 we are going to take that and round up to 37 degrees and that is your final answer.
Here is another example without breaking it down.

And just like that you can easily find the missing on every right triangle. Remember to write “SOHCAHTOA” on the top of your paper to help you out and remember to show your work!
Week 2 – Math 10
This week in math we learnt how to deal with negative exponents. When dealing with a negative exponent you need to move it to the other side of the fraction line. Remember every number is over 1. I will first explain the simple way to do it and then explain how to deal with a negative exponent while solving a bigger problem.
Step 1: As you can see it is very simple, take the base and power and move then to the other side of the fraction line; in this case you can’t see a fraction so you have to remember there is always an invisible 1, making it one over x to the third.

Step 2: If you have a coefficient in front of the power and the base it does not move with them. You take the base and the power and move it under the coefficient.

Now for a harder problem:

Step 1: To start with you need to put the entire problem over 1. Without changing anything in the brackets you change the exponent outside of the bracket to a positive exponent.

Step 2: Next step is to distribute the exponent by following the power law. Multiply the exponents.


Step 3: Next you need to take the y^-4 and move it to the top of the fraction to get rid of the negative exponent.

Step 4: You’re going to get rid of the 1 because it doesn’t change anything. And you have simplified it as much as you can.

And just like that now you know hoe to deal with negative exponents. Always remember every number is over 1 even if you can’t see it!
Week 1 – Math 10
This is my first week having math in person in about a year. The adjustment to having to do it online last march was very difficult as we were all preoccupied with what was going on in the world and the uncertainty of it all. As we move back into in person learning I have seen my grades, mental health and overall happiness go up a significant amount.
This week we learnt how to find the Greatest Commun Factor or GCF. When you are finding a GCF you are essentially finding the largest factor that the numbers share. You do. this process in a few different steps. Here is how:
Step 1: Break the two numbers down in factor trees and find all the prime factors. To make a factor tree you need to keep breaking the number down until you get to a prime number (2,3,5,7,11…)

Step 2: Find all the factors of both numbers and right them all down. If you want to check you did it right, all the factors of its respected number, when multiplied together should equal the number.

Step 3: Looking at the list of number in front of you find the common factors. I circle them for a visual. In this case it would be 3.

Step 4: And just like that you have found the GCF. 3 is the largest number that divides into both 18 and 21. Tip: Even if there are 3 common factors always pick the greatest of them.

Now that we have the basics down, we can use some bigger numbers. Using the same steps, we will be able to find the GCF of any number. In this case I first broke down 78 and 112 into factor trees to find its prime factors. I then wrote out the prime factors and was easily able to identify that 2 is the GCF of 78,112.
Tip: When finding the GCF of bigger numbers instead of using a factor tree you could use a factor ladder which will allow you to stay more organized.
And just like that you now know how to find the Greatest Common Factor of any number big or small.